


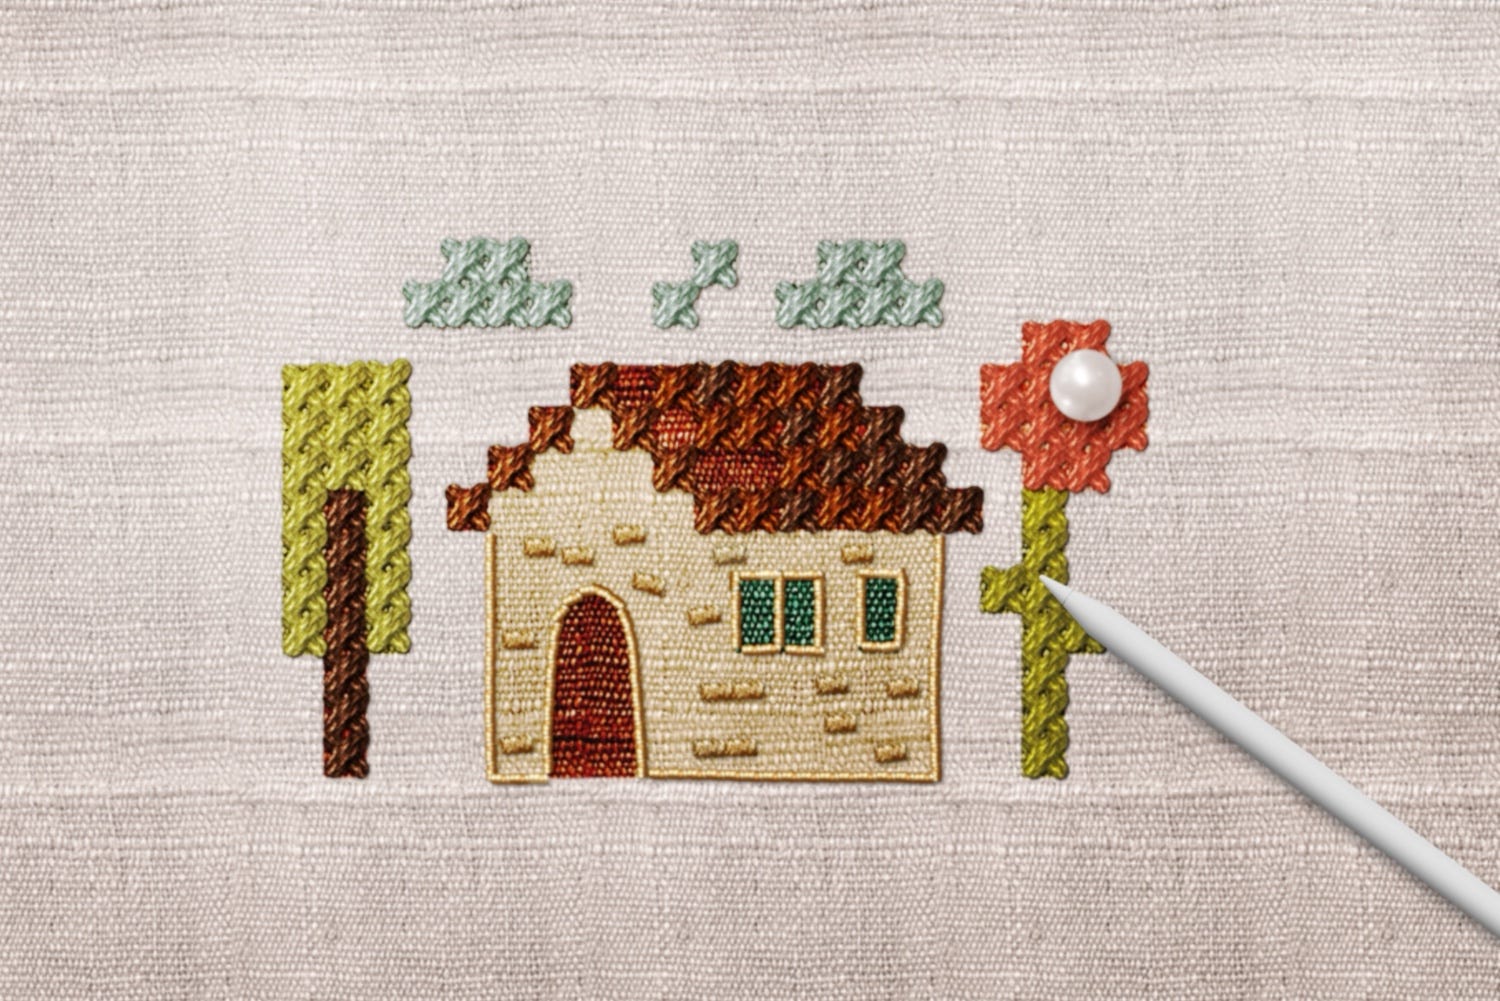
🧵Stitch This Cute House in Procreate! (No Actual Needle Needed)
Your fun guide to creating digital embroidery with free brushes & palette

Hello, creative friends! 🙌
In this tutorial, we’ll capture the cozy charm of embroidery in digital art by creating this embroidered house scene right in Procreate!
Don’t worry if you’ve never tried anything like this before.
I’ll guide you through each stage:
Preparing your pixel art and transforming it with a soft, blurred base.
Using blend modes to paint your design onto a fabric texture.
Working with dual-color embroidery brushes to create different stitch and embellishment effects.
Adding simple shadows to give your digital embroidery a lovely, three-dimensional feel.
To make things super easy, I’m also sharing the Procreate working file with the initial pattern, the special brush pack, and a color palette with all the colors we’ll use.
So, grab your Apple Pencil, and let's have some fun stitching together!
Step 0. Get the Files
To get the files, go to my site by following this link: Embroidery House Pack
Once the free checkout is complete (you won’t need to enter any card details), a download button will appear for the .zip file containing all the tutorial assets.
Download and save:
Tap the download button.
When prompted, save the .zip file to your iPad’s Files app (you can choose a specific folder like Downloads).
Unzip the folder:
Open the Files app on your iPad and navigate to where you saved the .zip file.
Simply tap once on the .zip file. Your iPad will automatically create a new, unzipped folder next to it with the same name.
Inside the unzipped folder, you’ll find:
Working File:
WORKING_FILE.procreate
(This is the Procreate file we’ll be using to start the tutorial, with layers already set up for you)Finished Artwork (for reference):
FINISHED_🏡.procreate
(You can open this to see the completed design as a guide)Embroidery Brushes:
🏡_Guide.brushset
(The custom brush set for this tutorial)Color Palette:
🏡_Embroidery_House.swatches
(The color palette with all our “thread” colors)

Let’s get those brushes and colors into Procreate!
Simply tap on the 🏡_Guide.brushset file (it will automatically import into your Brush Library), and then do the same for the 🏡_Embroidery_House.swatches file (this will add the palette to your Color Panel).
Now, tap on WORKING_FILE.procreate to open it up, and we’re officially ready to start creating our embroidery house!
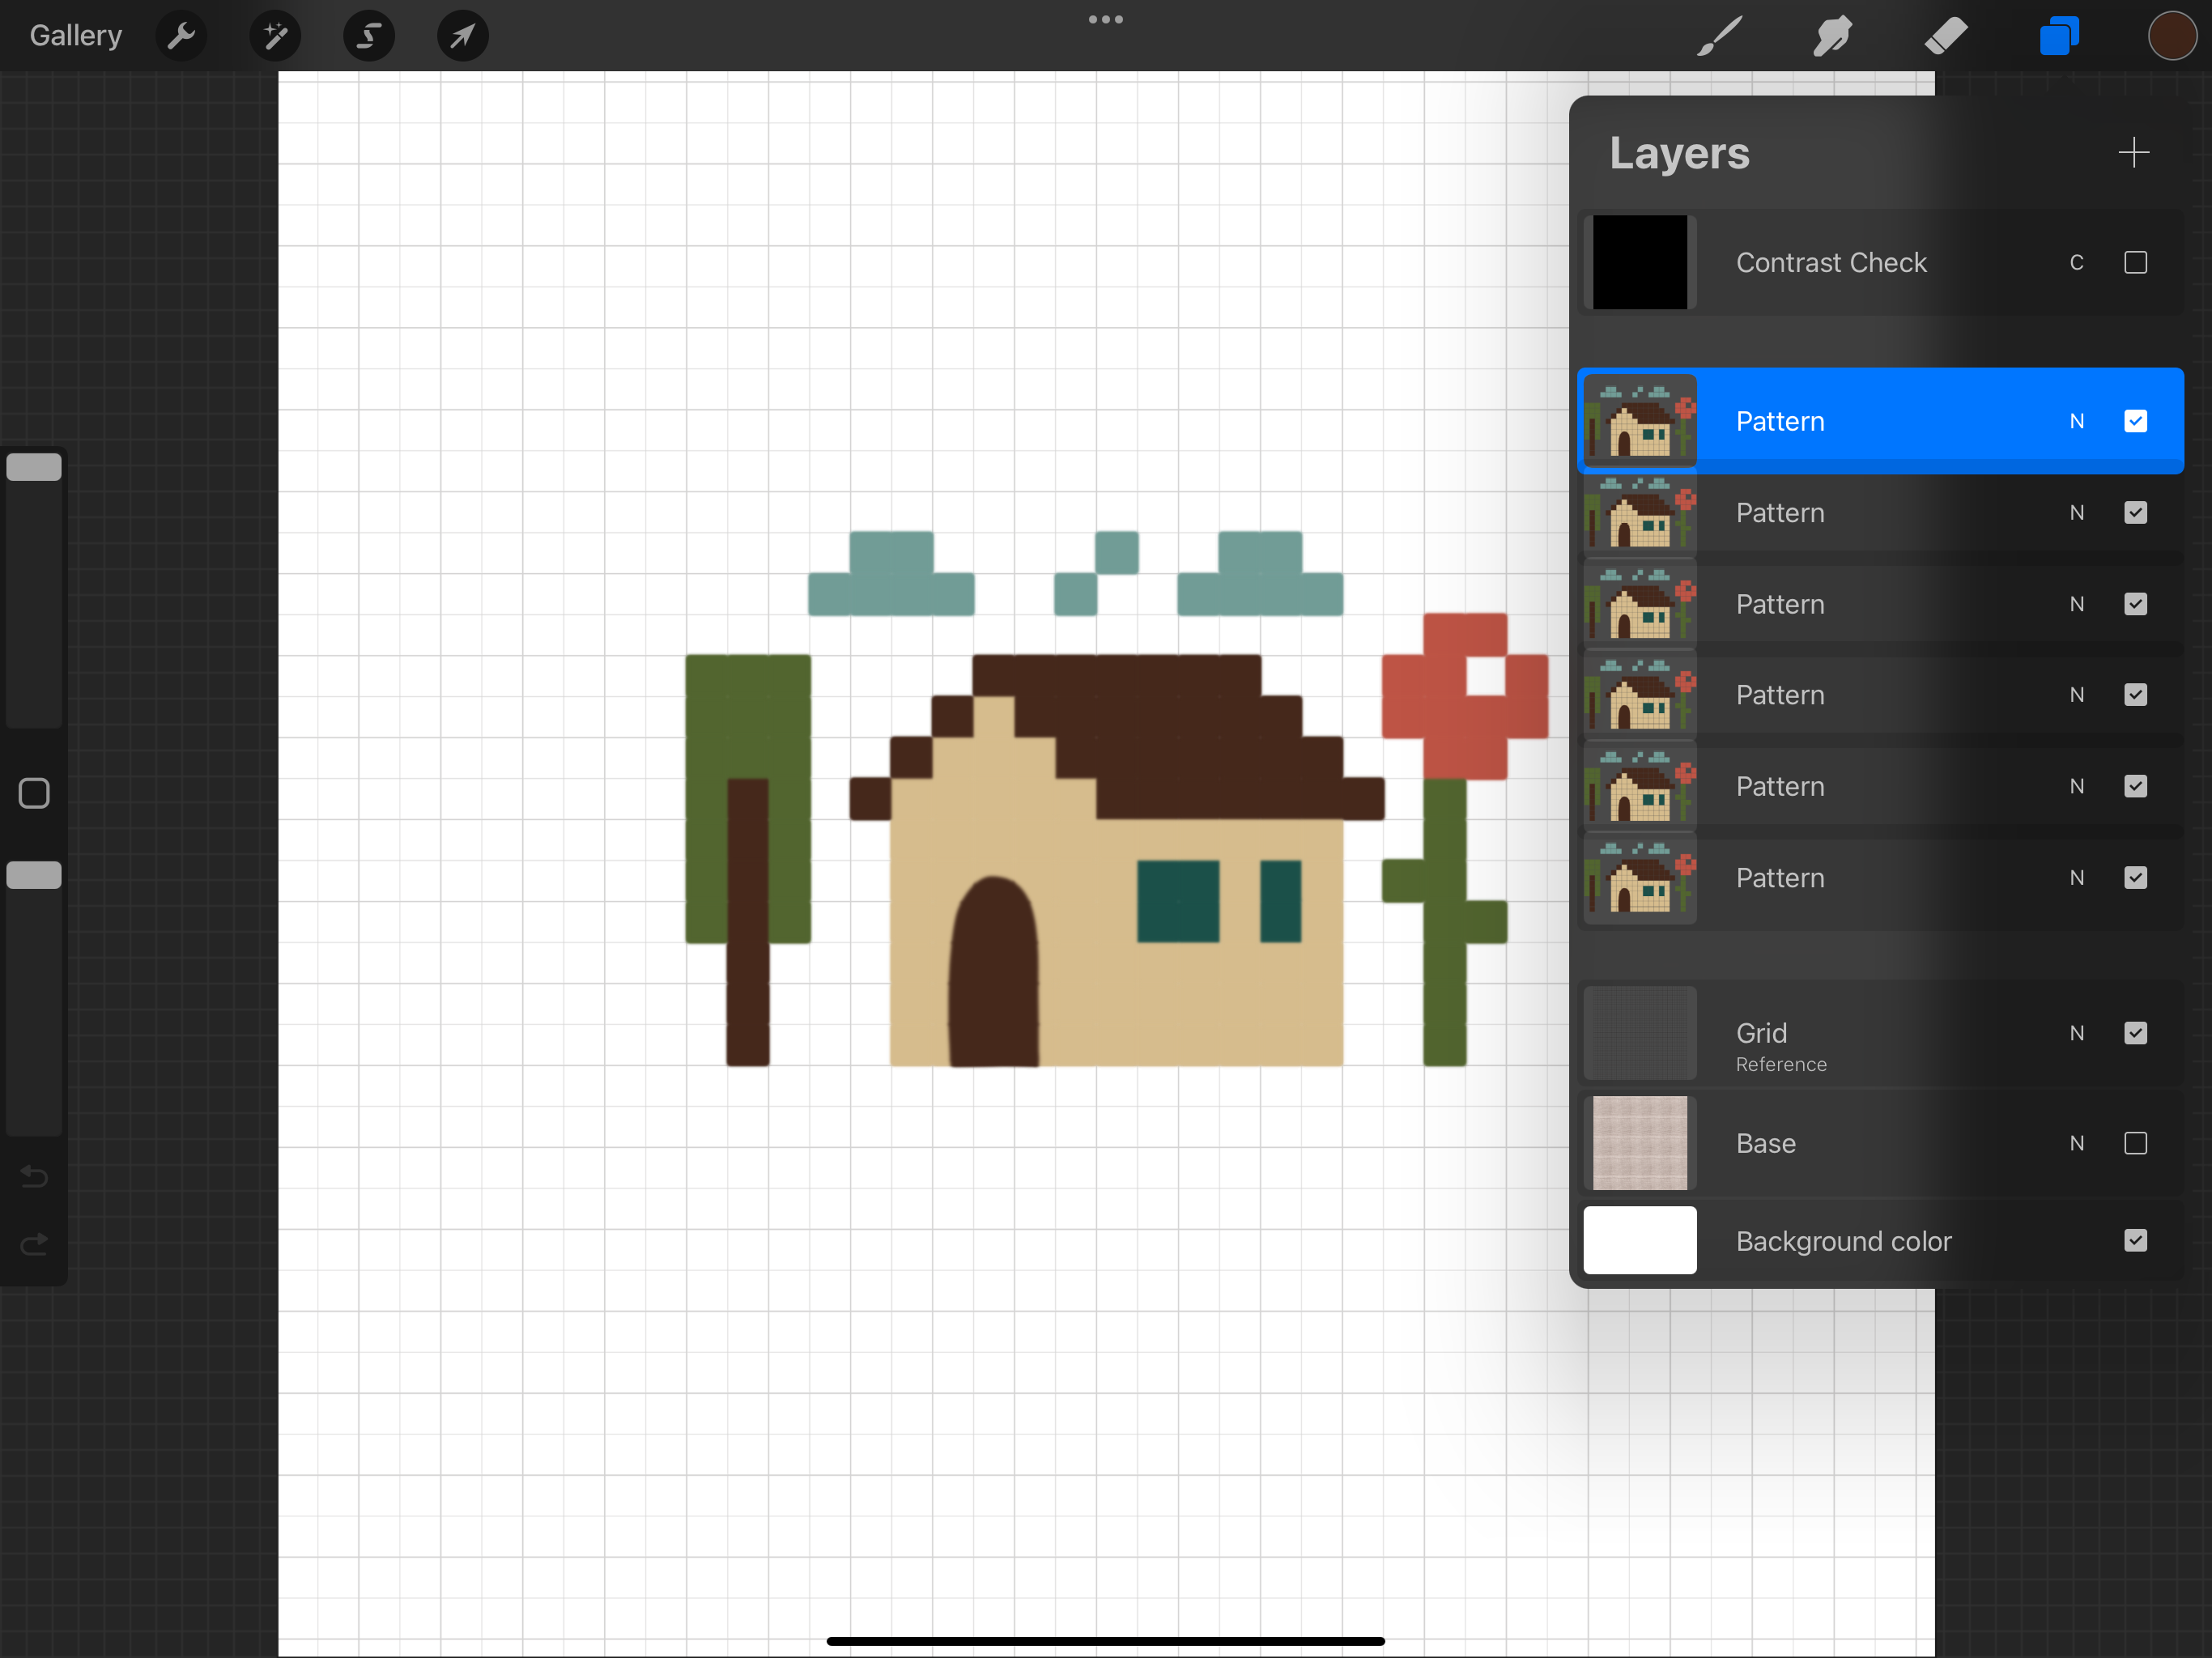
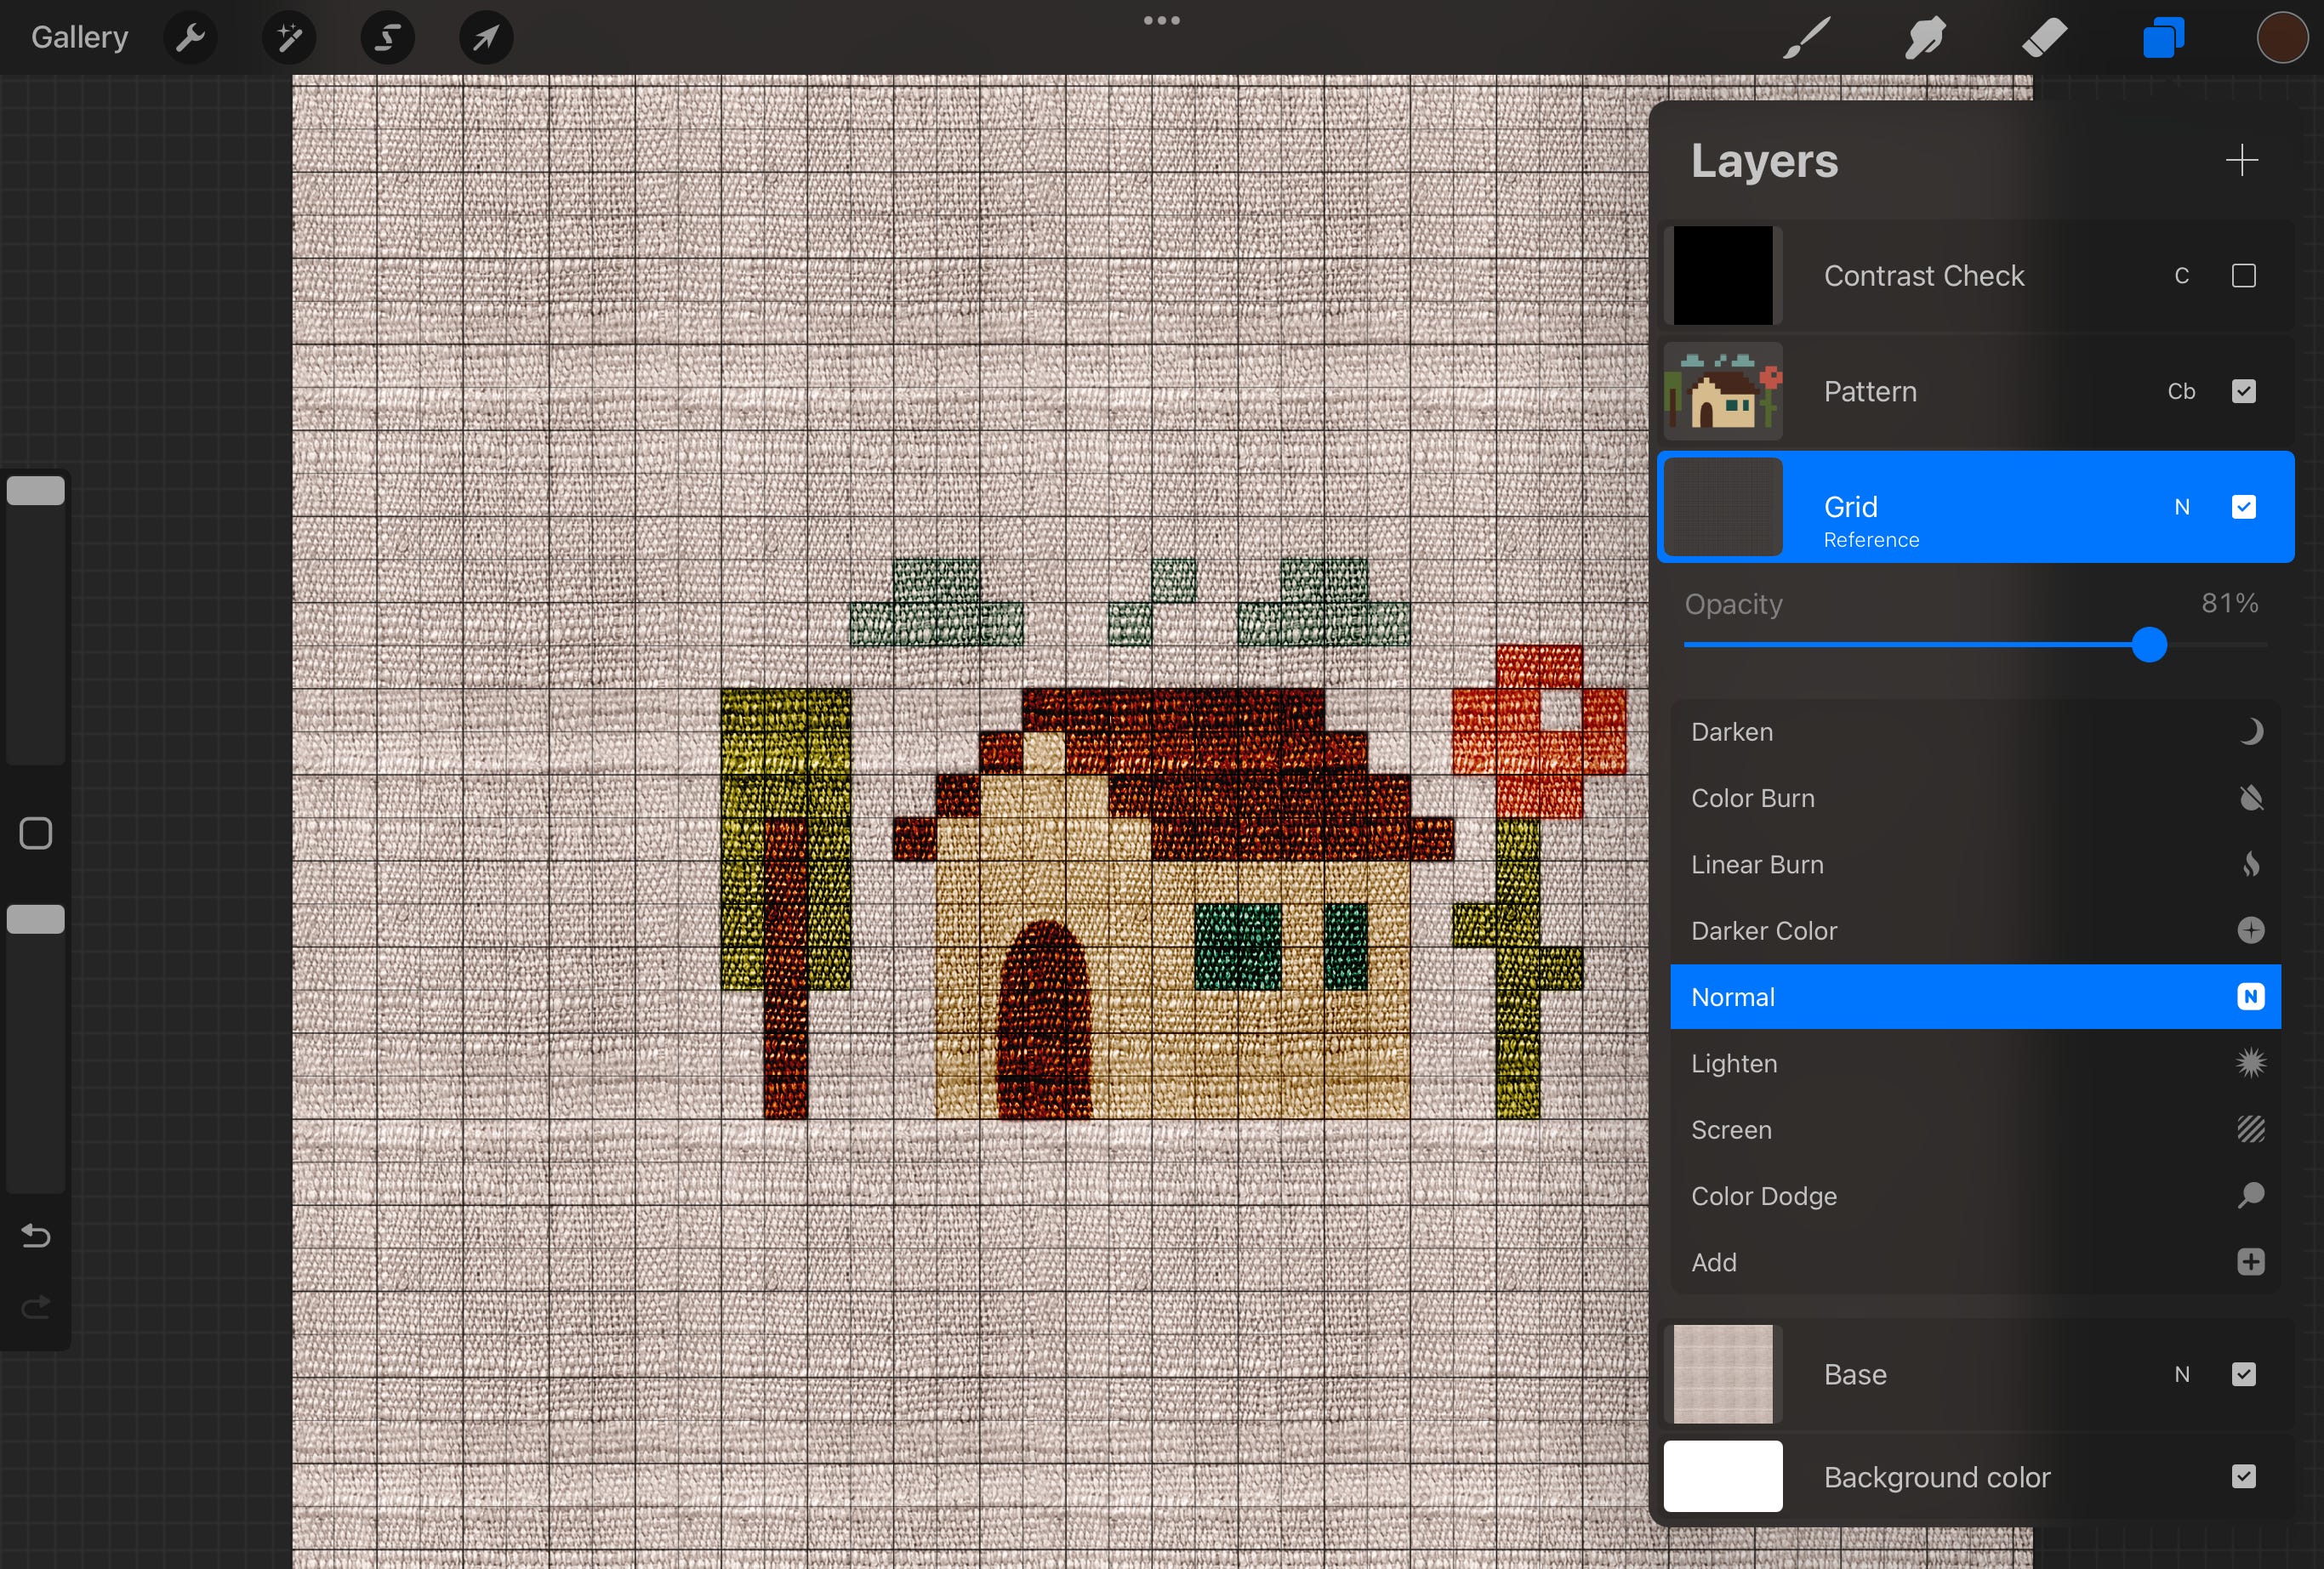
Inside the Procreate working file for this tutorial, you’ll find these layers already set up for you:
Base layer with a cloth texture we’ll use for the final look.
Grid layer set as a Reference Layer.
Pattern layer group showing the initial design, created using the method from my Plan Your Cross-Stitch Patterns guide (with the door hand-drawn as an exception).
Contrast Check layer to quickly assess how well your colors work together.

Step 1. Flatten and Rename the Pattern Group
To start, we need to combine all the individual color layers within our Pattern group into a single, flat layer. Then, we’ll give it a clear name. (You may want to create a copy before you flatten anything, which I omit for the sake of this tutorial)
Flatten the Pattern Group:
In the Layers panel, locate the group currently named Pattern. This group contains all the colored squares that form our house and its surroundings.
Tap on the Pattern group to select it.
Tap the group again (or on its thumbnail) to open its Layer Options menu (as shown in the image where you see Rename, Ungroup, Flatten, etc.).
From this menu, choose Flatten.
This will merge all the layers inside the Pattern group into one single layer.

This new layer will automatically be named after the bottom layer inside the group (Beige in this case).

Rename the Flattened Layer:
Tap on this newly flattened layer (currently named Beige).
Tap it again to open its Layer Options menu.
Select Rename.

The keyboard will appear. Type in Pattern as the new name.
Press Enter or tap outside the text field to confirm the new name.

(Optional Tip: Why Bother Renaming Layers?)
You might be thinking, Why spend time renaming a layer if Beige (or whatever its old name was) already gives me a name to reference? And sometimes, for a very simple project, you might get away with it! However, I’ve learned from experience that consistent layer naming is a real sanity-saver, especially when you find yourself with 53 layers all called Layer 1, Layer 2, Copy of Layer 2, and so on. Good naming helps keep your projects organized and your mind clear! ☺️
Step 2. Blur and Duplicate the Pattern
Now, bear with me on this step!
It might seem a bit odd to blur our nice pixel pattern, but this is a key part of creating the look we aim for. We’ll first apply a subtle blur to soften the edges, and then duplicate the layer several times to build up its opacity and cover any small gaps that remain from the squares.
Apply a Subtle Gaussian Blur:
Make sure your Pattern layer is selected (it should be highlighted blue).

Tap the Adjustments icon (the magic wand 🪄) in the top menu bar.
From the Adjustments menu, select Gaussian Blur.

Gaussian Blur bar will appear at the top of your screen. Slide your finger or Apple Pencil to the right on the canvas until the blur reaches about 3%. We want just enough blur to soften the hard pixel edges without making the shapes unrecognizable.
Once you have approximately 3% blur, tap the Adjustments icon again to apply and exit the blur mode.

Duplicate the Blurred Layer:
Now, we need to build this blurred layer up to create a solid base.
In the Layers panel, with your blurred Pattern layer still selected:
Swipe left on the Pattern layer. This will reveal three options: Lock, Duplicate, Delete.
Tap Duplicate.

You'll now have two identical blurred Pattern layers.
Repeat this duplication process until you see no gaps. You should end up with about 4-6 identical blurred Pattern layers stacked on top of each other.

Step 3. Merge the Duplicated Pattern Layers
Now that we have several identical blurred Pattern layers stacked up, we need to merge them back into a single, solid layer. This simplifies our Layers panel and allows us to treat this soft base as one object.
Locate your stacked Pattern layers in the Layers panel.
Merge with a Pinch Gesture:
Place your index finger on the topmost Pattern layer and your thumb on the bottommost Pattern layer in your stack.
Pinch your fingers together on the screen.
Procreate will merge all the layers between (and including) your two fingers into a single layer.

Your stack of blurred Pattern layers should now be combined into one single Pattern layer. This layer will have a nice, solid, and slightly soft appearance, ready for the next steps!
Step 4. ‘Paint’ the Fabric with Blend Modes
Alright, this is where the magic starts to happen!
We’re going to make our flat pattern look like it’s actually part of the fabric.
Reveal the Fabric Texture:
First, let’s bring in our fabric. In the Layers panel, find the Base layer.
Tap the visibility checkbox on its right to make it visible. You should now see the fabric texture appear behind your pattern.
(btw, if you’d like, you may add any other fabric texture instead - it just has to be rather light)

Blend the Pattern onto the Fabric:
Now, select your Pattern layer so it’s active.
Tap on the small letter N on the right side of the Pattern layer (this letter indicates the current blend mode, which is Normal by default). This will open the Blend Mode and Opacity menu for that layer.
From the list of Blend Modes, scroll down and select Color Burn.
You’ll immediately see your pattern colors interact with the fabric texture, almost like they’re dyeing the threads.
Adjust opacity for a softer blend:
While this same menu is open, look for the Opacity slider at the top.
Adjust the opacity of the Pattern layer down slightly, to around 90-95%. This slight reduction helps the blend look a bit more natural and less overpowering.
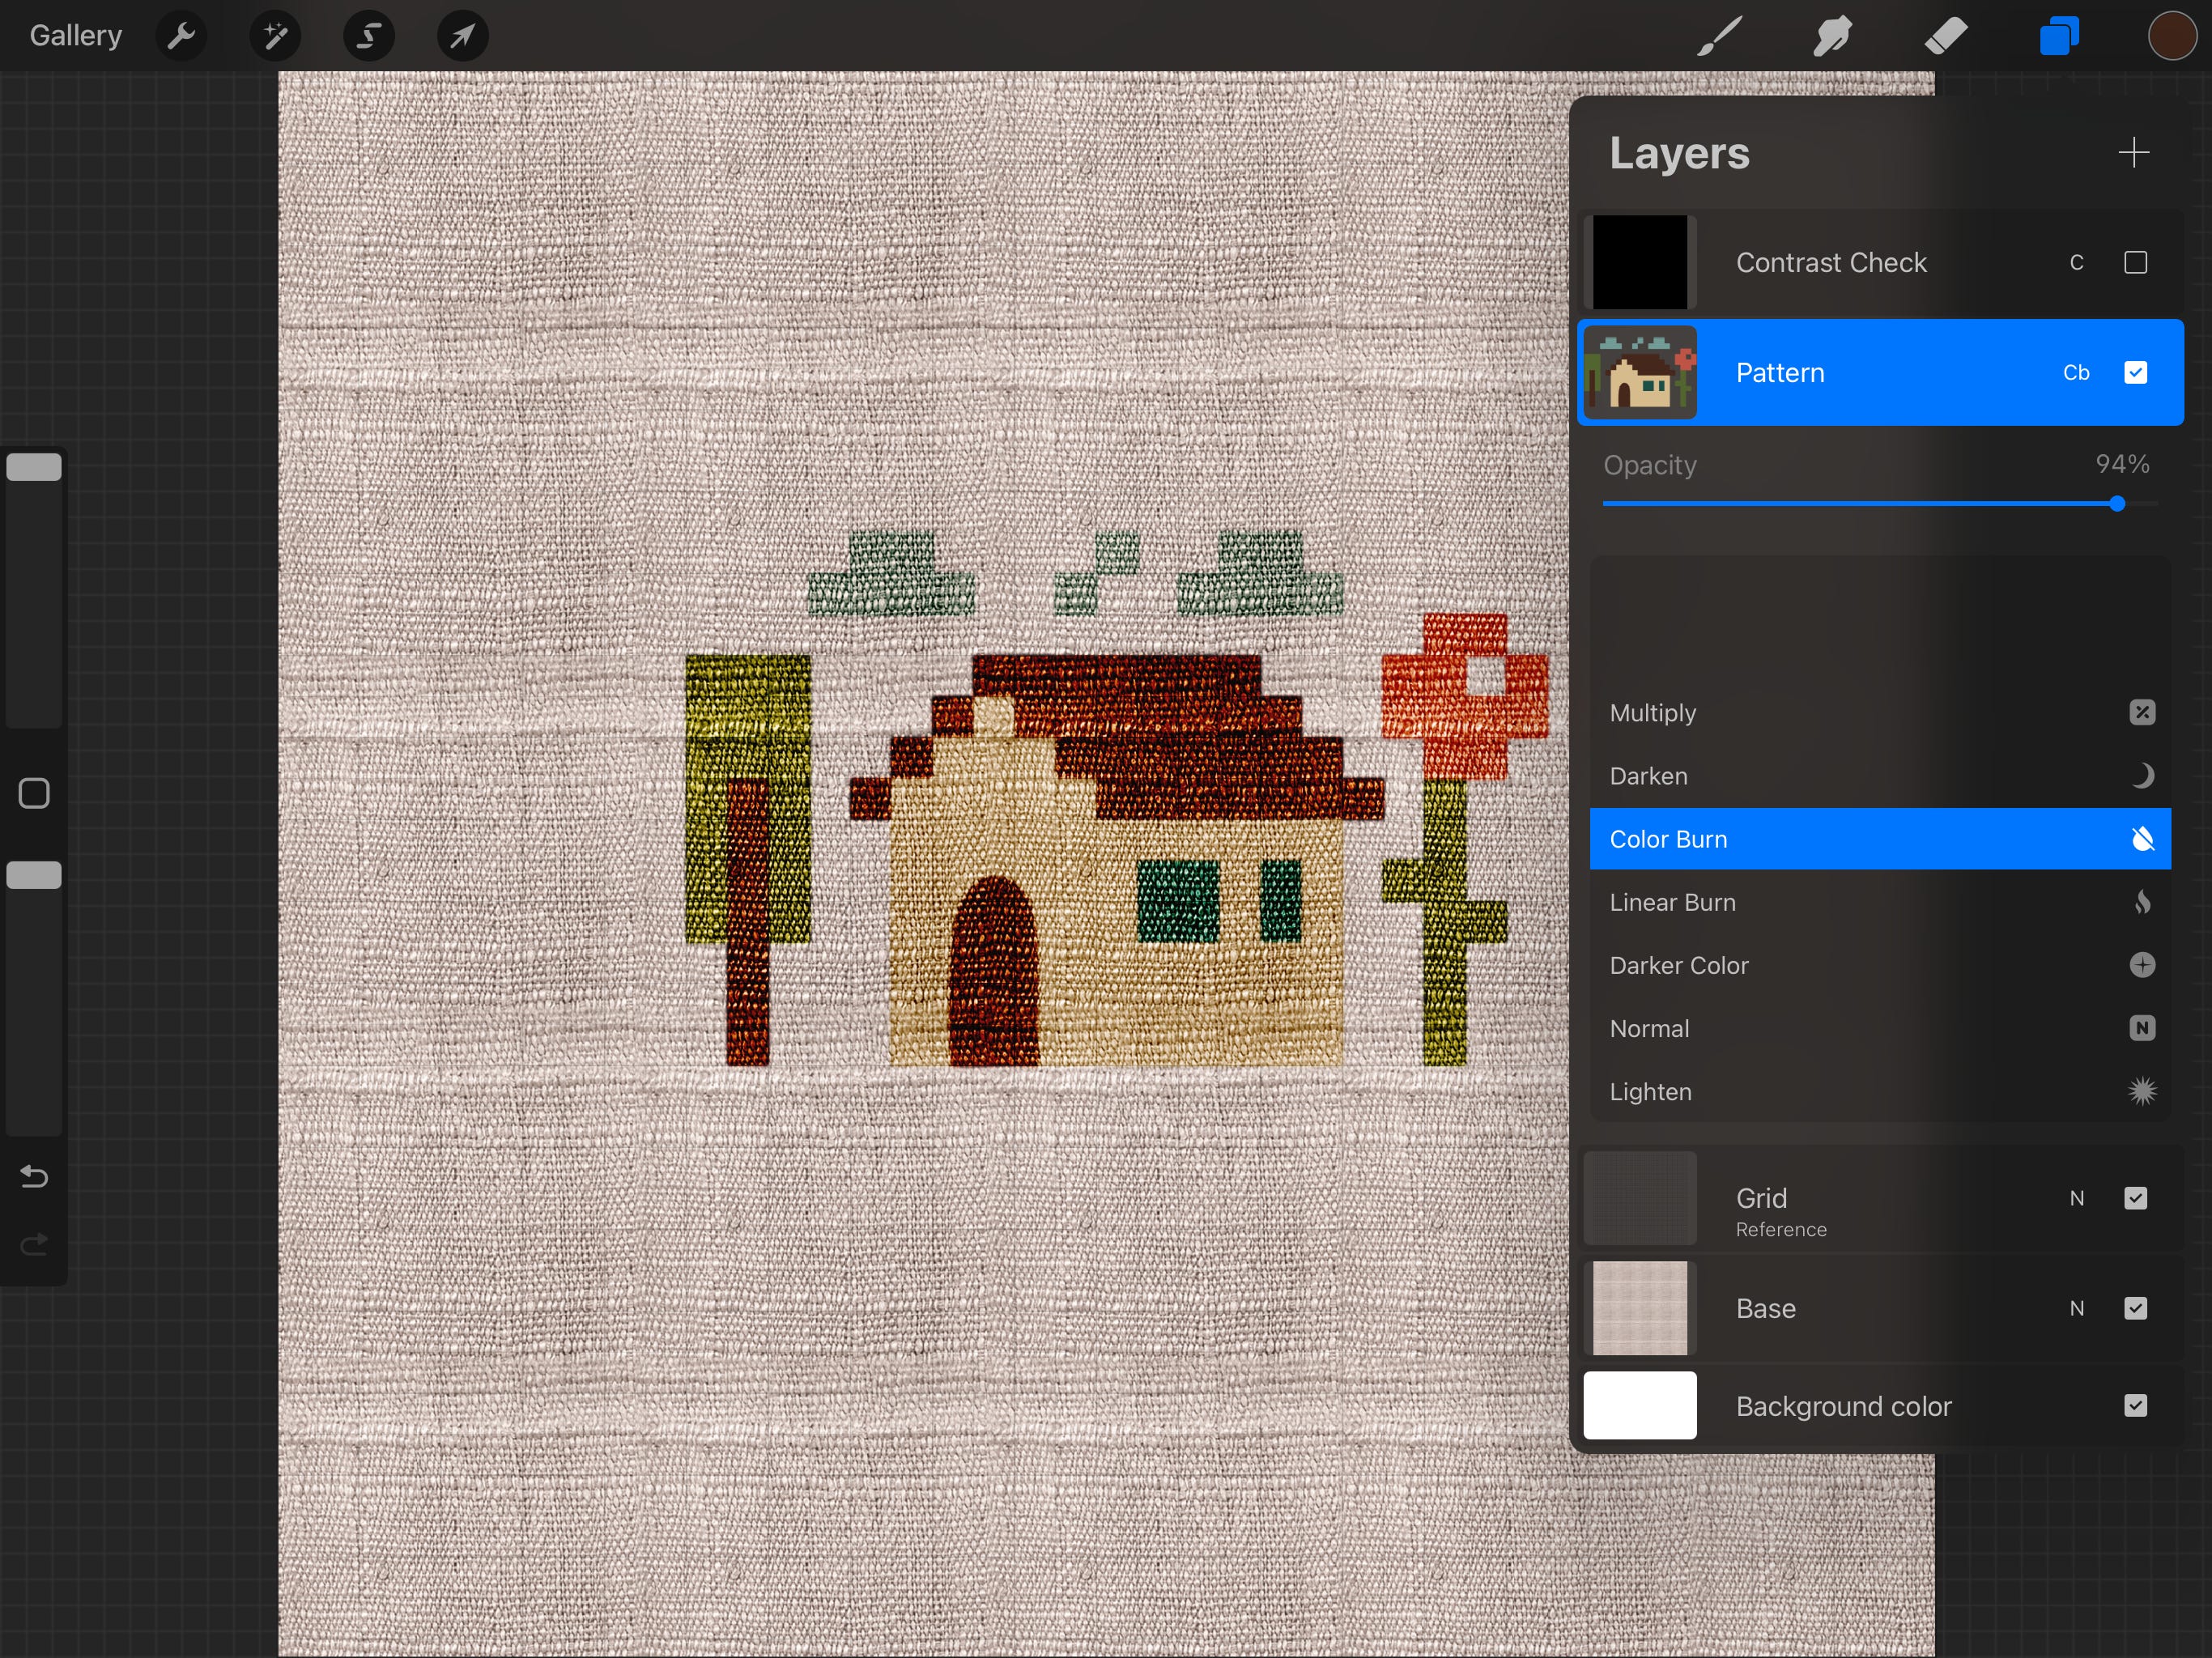
And there you have it! Your pattern should now look beautifully painted or dyed onto the fabric texture.
All done! ...Just kidding, but I really like how this stage looks! 😉
Step 5. Prepare for Stitching - Grid, Brushes, and Palette
Alright, the final steps before the stitching.
Adjust Grid Opacity:
To make our digital cross-stitching precise and easier to follow, let’s first make our grid a bit more prominent:
Select your Grid layer in the Layers panel.
Tap the small letter N on that layer. This opens the Opacity slider for the layer.
Increase the Opacity until the grid lines are clearly visible to you, but not so dark that they become distracting. I often find that around 80-85% works well for me, but the key is your comfort. Adjust it so you can easily see where each square begins and ends.
Now that our grid is nice and clear, we’re ready to lay down some digital stitches!
Install the 🏠 Guide Brush Pack:
To help you create the specific textures and stitches for our little embroidered house, I’ve assembled a special free brush pack just for this tutorial!
It includes a selection of brushes handpicked from some of my larger premium collections:
#02✨/Small Cross/ (from the Cross-Stitch Art Box)
Basic Beads (from the Ancient Treasures Box)
Am I Bamboo? and Vintage Pearl (from the Goldwork Art Box)

To install them (if you haven’t already), do the following:
After downloading, open your iPad’s Files app and locate the downloaded .brushset file (it usually lands in your Downloads folder or wherever you chose to save it).
Simply tap on the .brushset file.
Procreate will automatically open, and the brushes will be imported. You’ll typically find the new brush set at the top of your Brush Library list.
Install the 🏠Embroidery House Color Palette:
Along with the special brushes, I'm also sharing a custom Procreate color palette that includes all the color pairs we’ll be using for our digital embroidery house.
If you wonder why color pairs are needed, please read this post:

How to install the color palette in Procreate:
After downloading, open your iPad’s Files app and locate the downloaded .swatches file.
Simply tap on the .swatches file.
Procreate will automatically open, and the palette will be imported. You can find it by opening your Color Panel (the color circle in the top right) and tapping the Palettes tab (located at the bottom of the Color Panel, near Disc, Classic, Harmony, and Value). New palettes usually appear at the bottom of your Palettes list.
Set it as default:
Find your newly imported palette in the list.
Tap on the three dots (...) next to its name.
Choose Set as default. (If you don’t see this Set as default option, it means the palette is already active as your default)


Tap on Disc at the bottom of the Color Panel to get back to your normal color selection view.
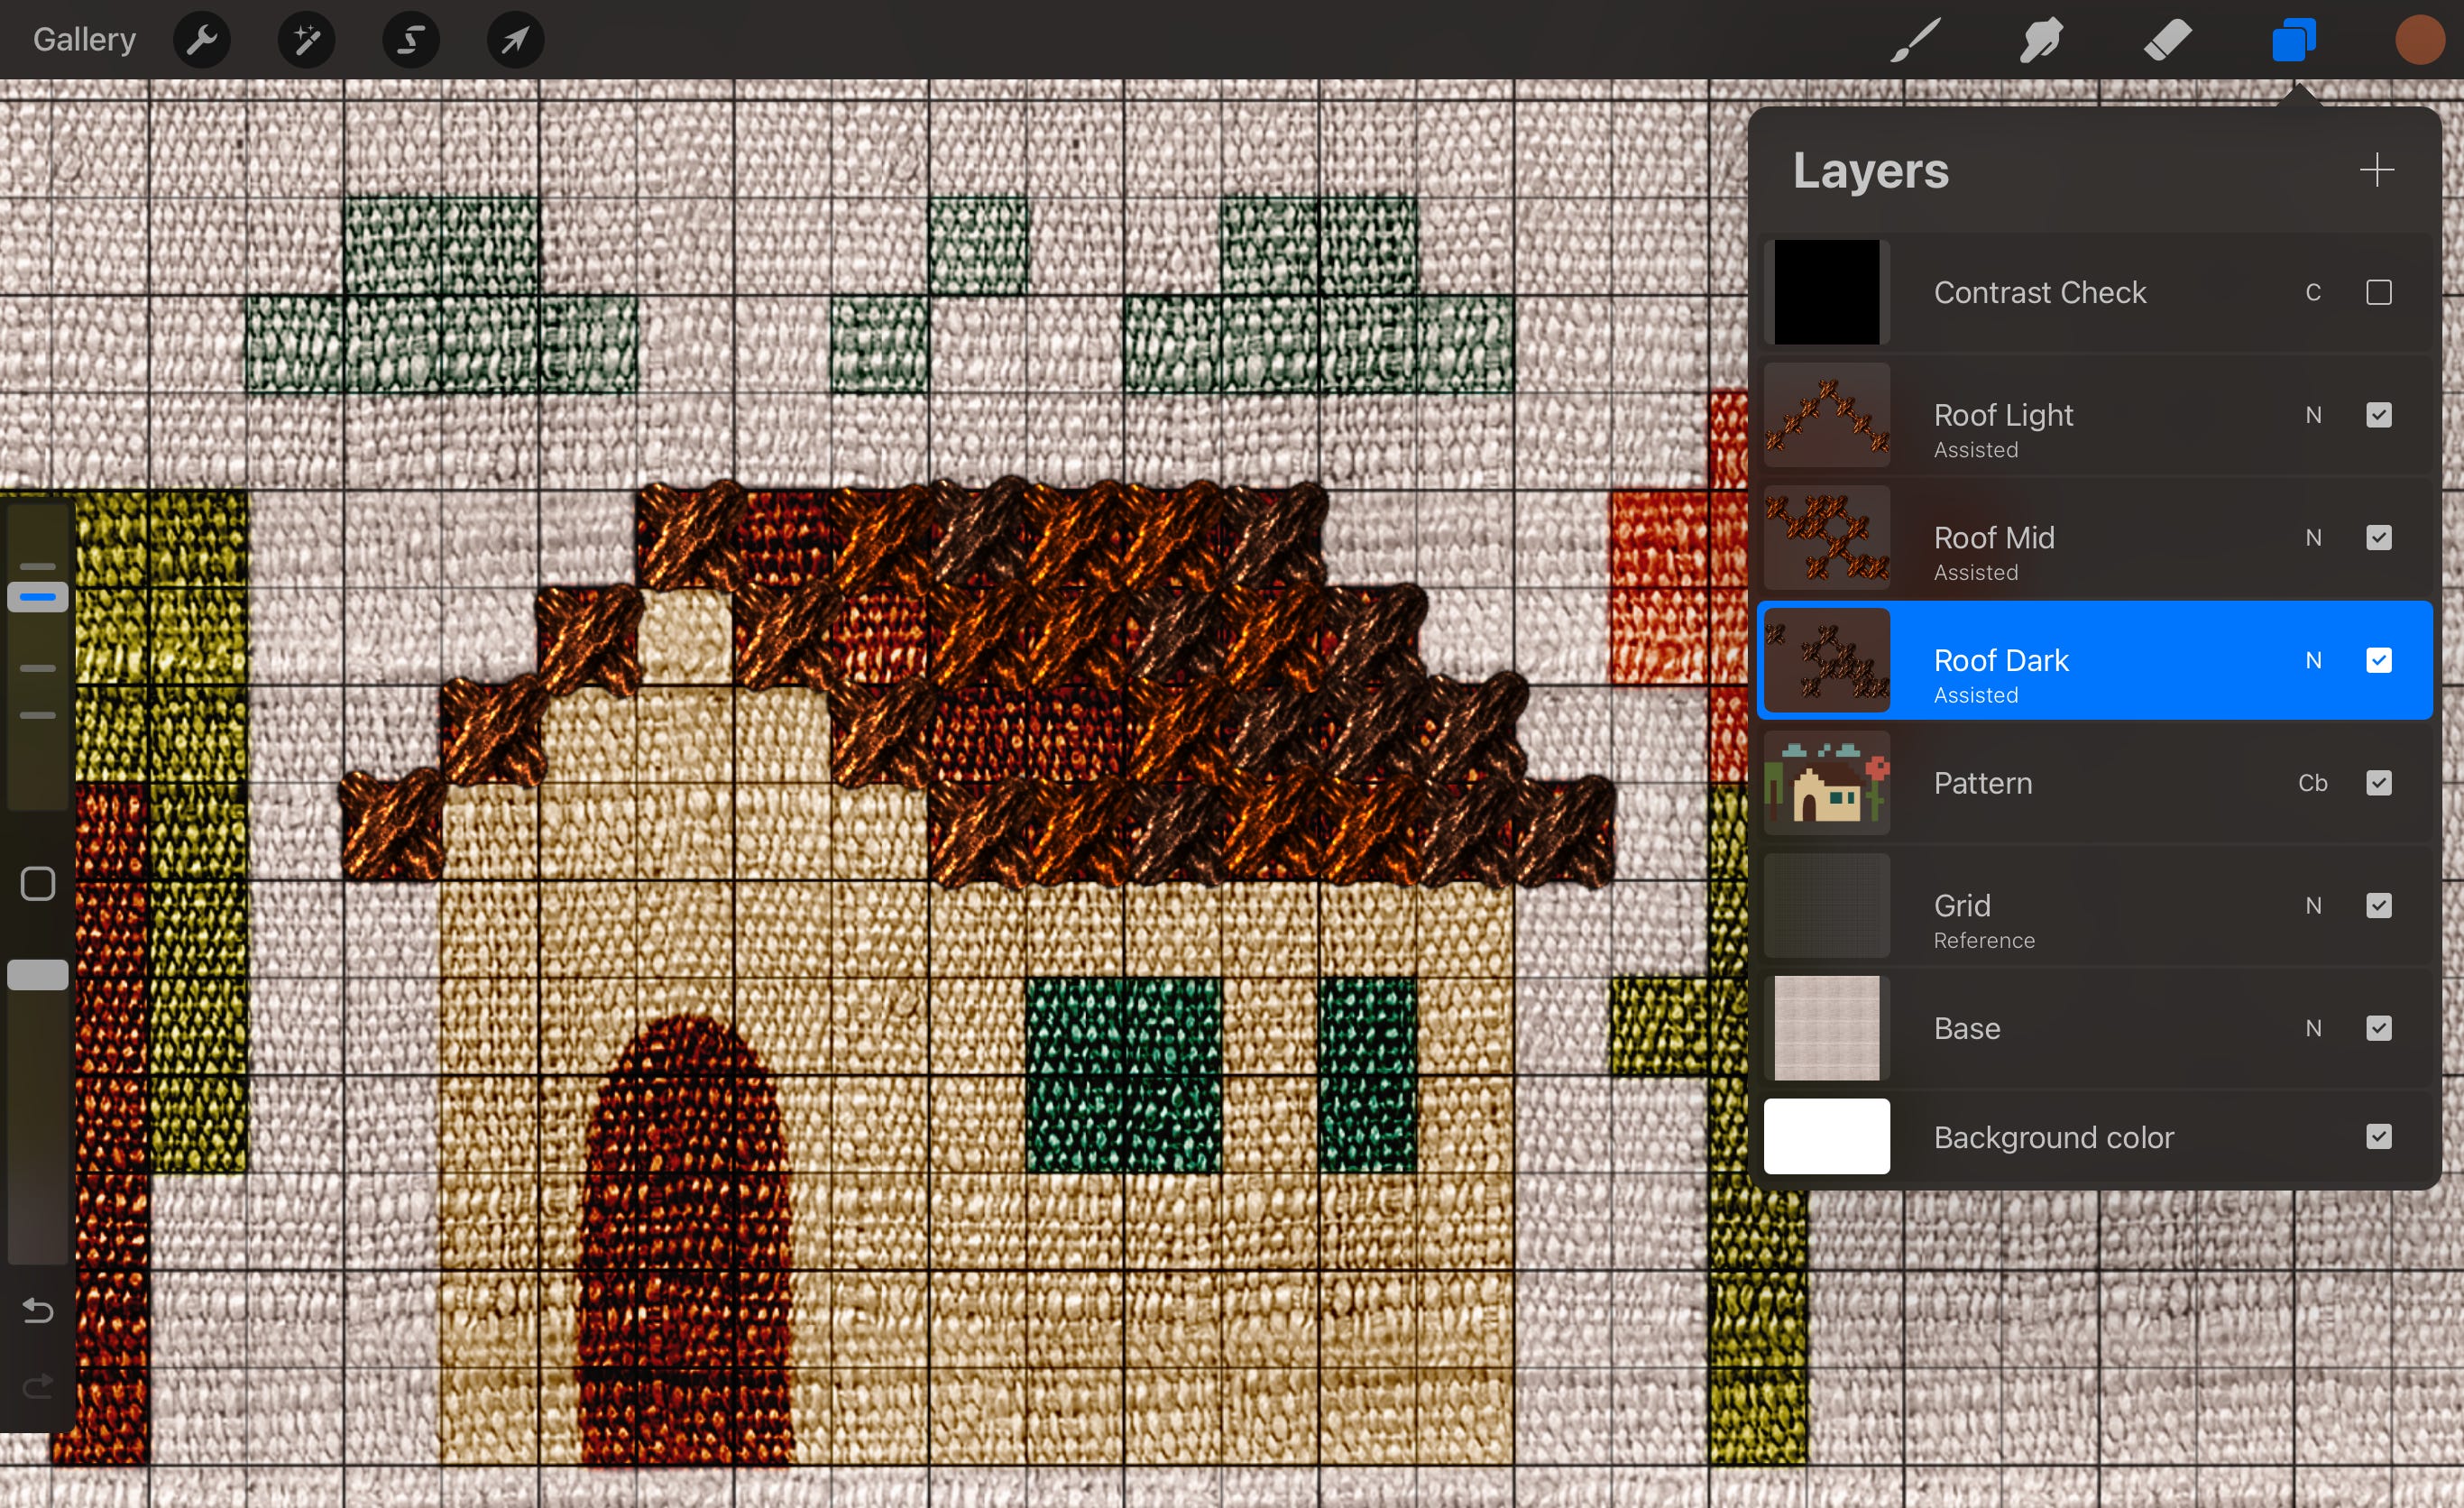
Step 6. Stitch the Roof
Now that we have our tools ready, let’s start with the roof!
To create a textured, multi-tonal look for the roof tiles, we'll use three different shades of “thread” (colors from our palette). Each shade will go on its own layer, which gives us great control.
Create Layers for Roof Colors:
First, ensure you are working above your main Pattern layer (the one with the Color Burn blend mode).
In the Layers panel, tap the + icon three times to create three new, empty layers. These new layers should appear at the top of your layer stack.
(Optional but recommended: If these new layers are not already above the Pattern layer, tap and hold on each one and drag it above the Pattern layer.)
Rename Your New Layers:
We need to name these layers clearly to keep track of our “threads.” Thus, rename these three new layers to:
Roof Dark
Roof Mid
Roof Light
To rename a layer, tap on it in the Layers panel, tap it again to open the Layer Options menu, and select Rename.

Now you should have three dedicated layers ready for applying the different shades to the roof.
(Optional) Set Up Procreate’s 2D Grid for Drawing Assist:
We’ll need it to help keep the strokes perfectly aligned horizontally or vertically.
Here’s how to configure it:
Enable Drawing Guide:
Tap the Actions icon (the wrench 🔧) in the top menu.
Go to the Canvas tab.
Toggle Drawing Guide ON.
(Don’t worry if it shows and looks distracting, we’ll turn the visual off again later since we’re already using our own visible Grid layer).
Set the guide type to 2D Grid:
Tap Edit Drawing Guide.
A new interface will appear. At the bottom, make sure 2D Grid is selected. (You don’t need to worry about its appearance settings like color or thickness, as we'll be hiding it).
Tap Done in the top right corner to save this guide type.
Hide the Procreate visual guide:
Now, back in the Actions menu (Wrench icon 🔧 > Canvas), you can toggle the Drawing Guide OFF.
By doing this, you’ve told Procreate that if you do enable Drawing Assist on any of your layers (by tapping the layer and selecting Drawing Assist from its menu), it should use a 2D grid to guide your strokes, even though Procreate’s own visual grid isn't currently displayed.
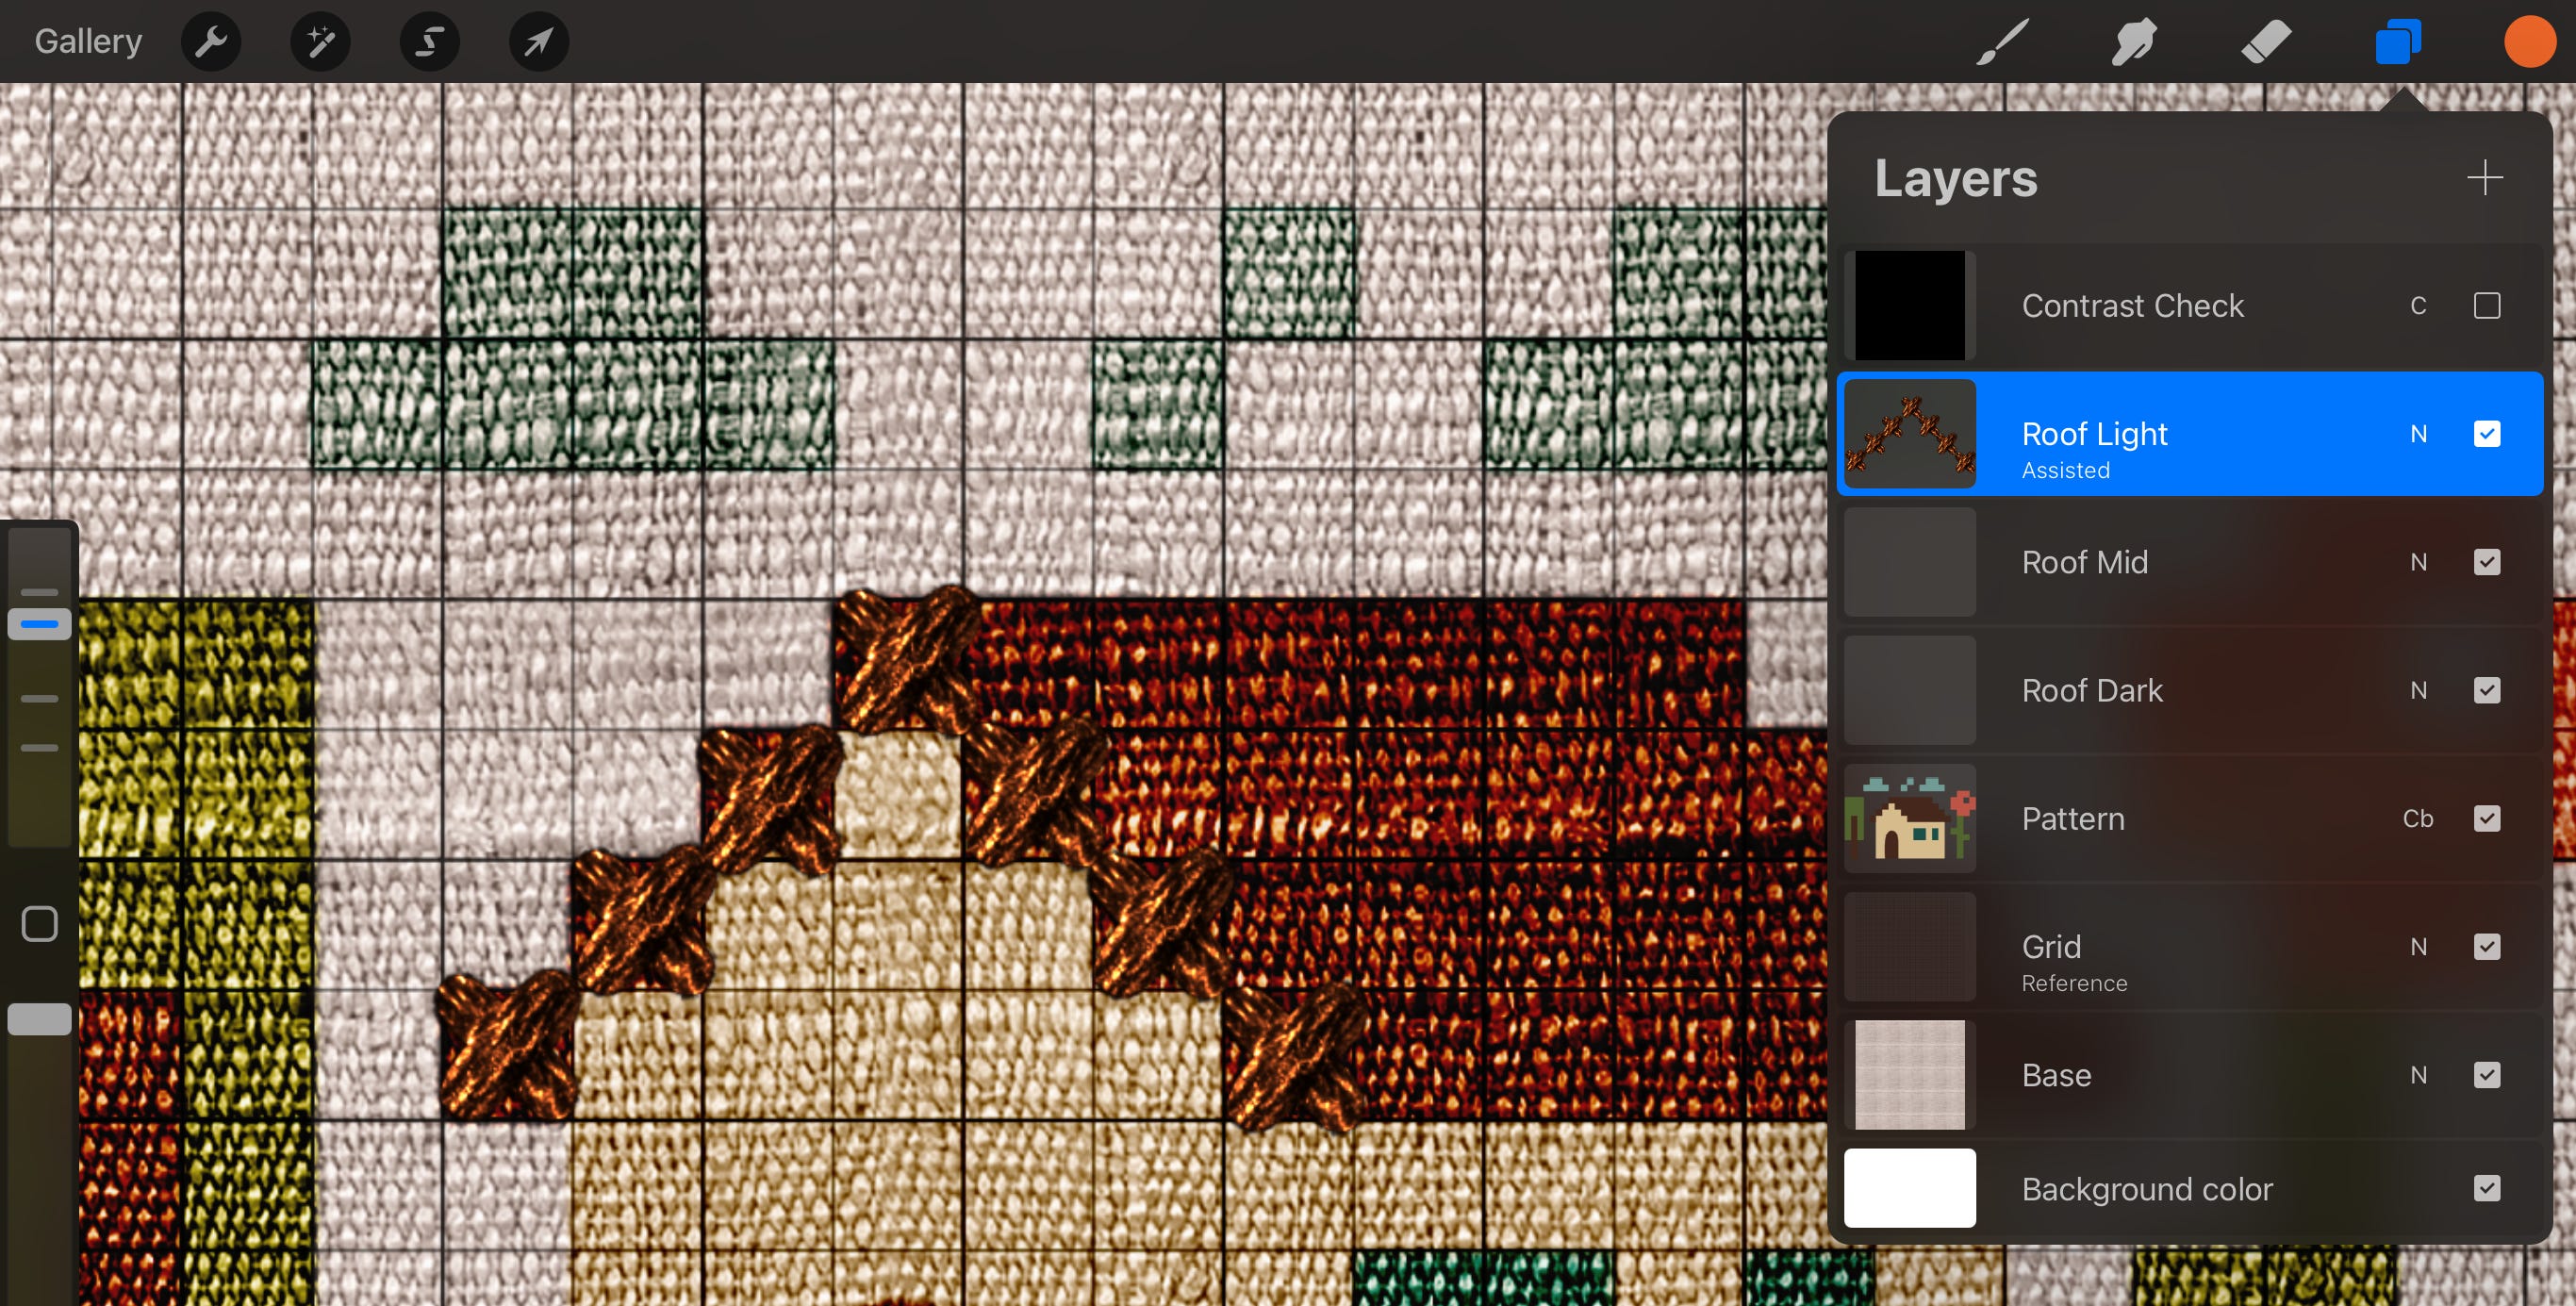
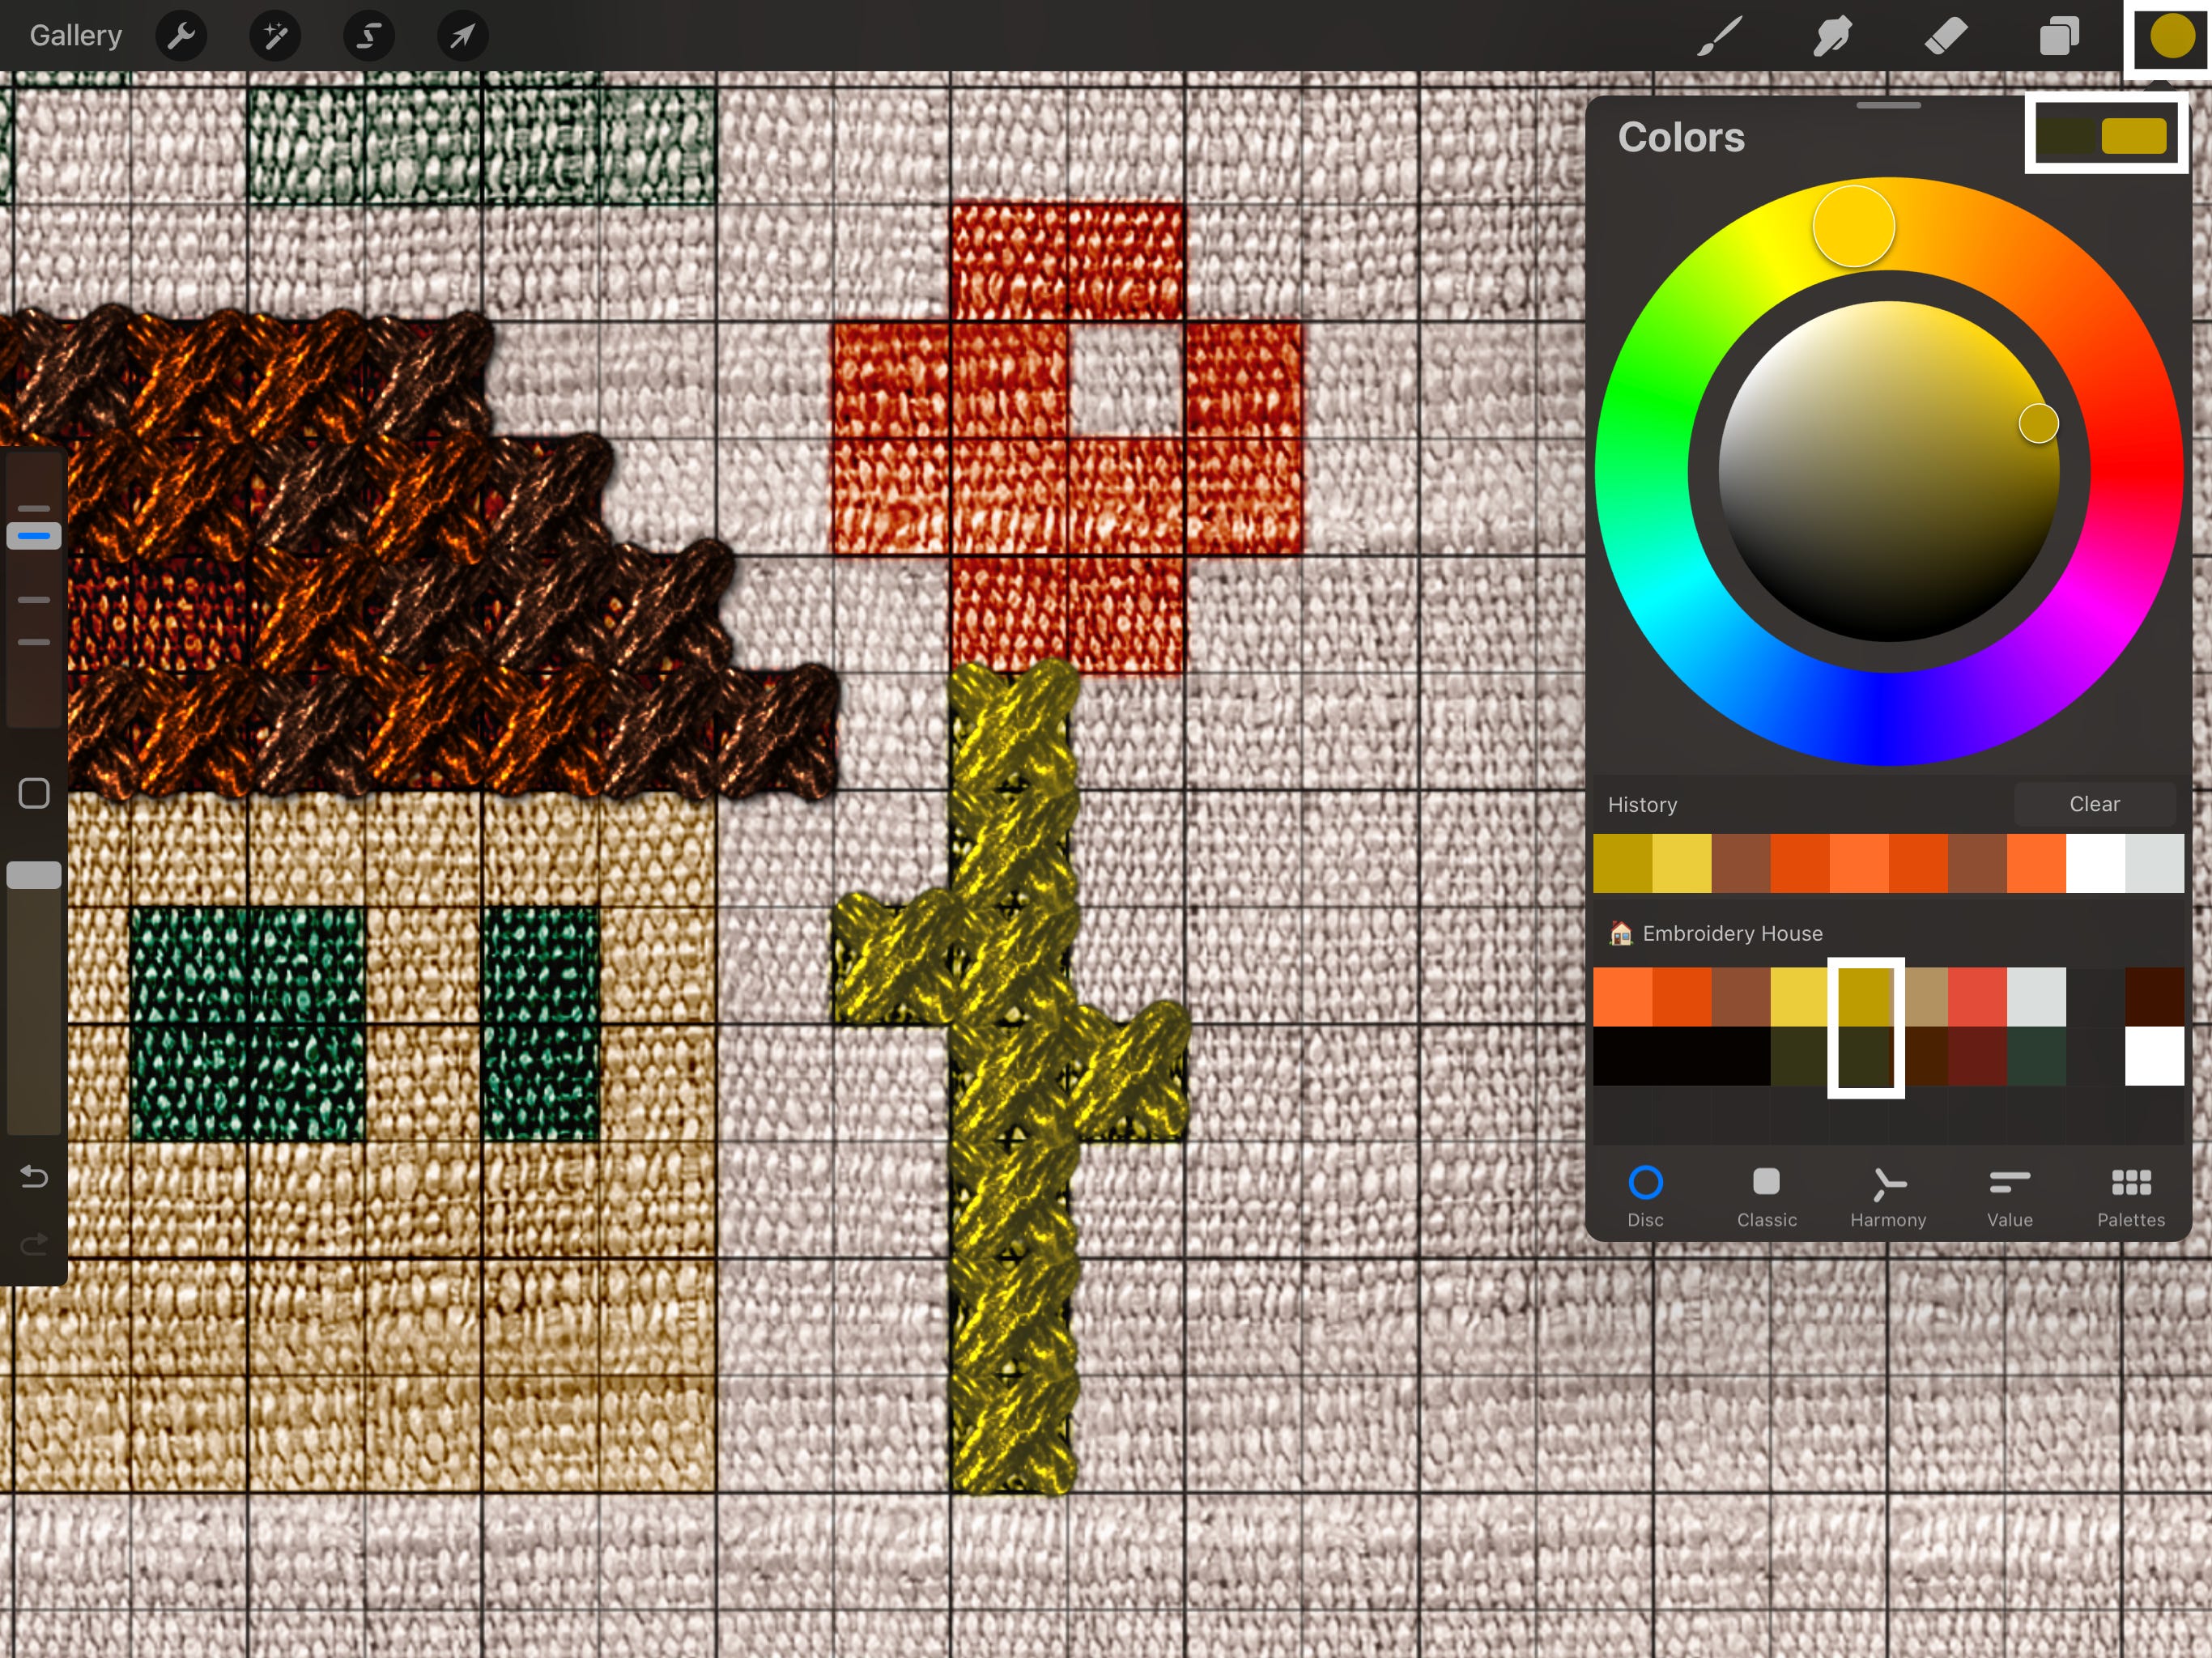
Working with the ‘Roof Light’:
Activate Layer and Drawing Assist:
In the Layers panel, tap on your Roof Light layer to make it active (it will highlight in blue).
Tap the Roof Light layer again to open its Layer Options menu.
From the menu, tap Drawing Assist to enable it. A small Assisted label will appear under the layer name.

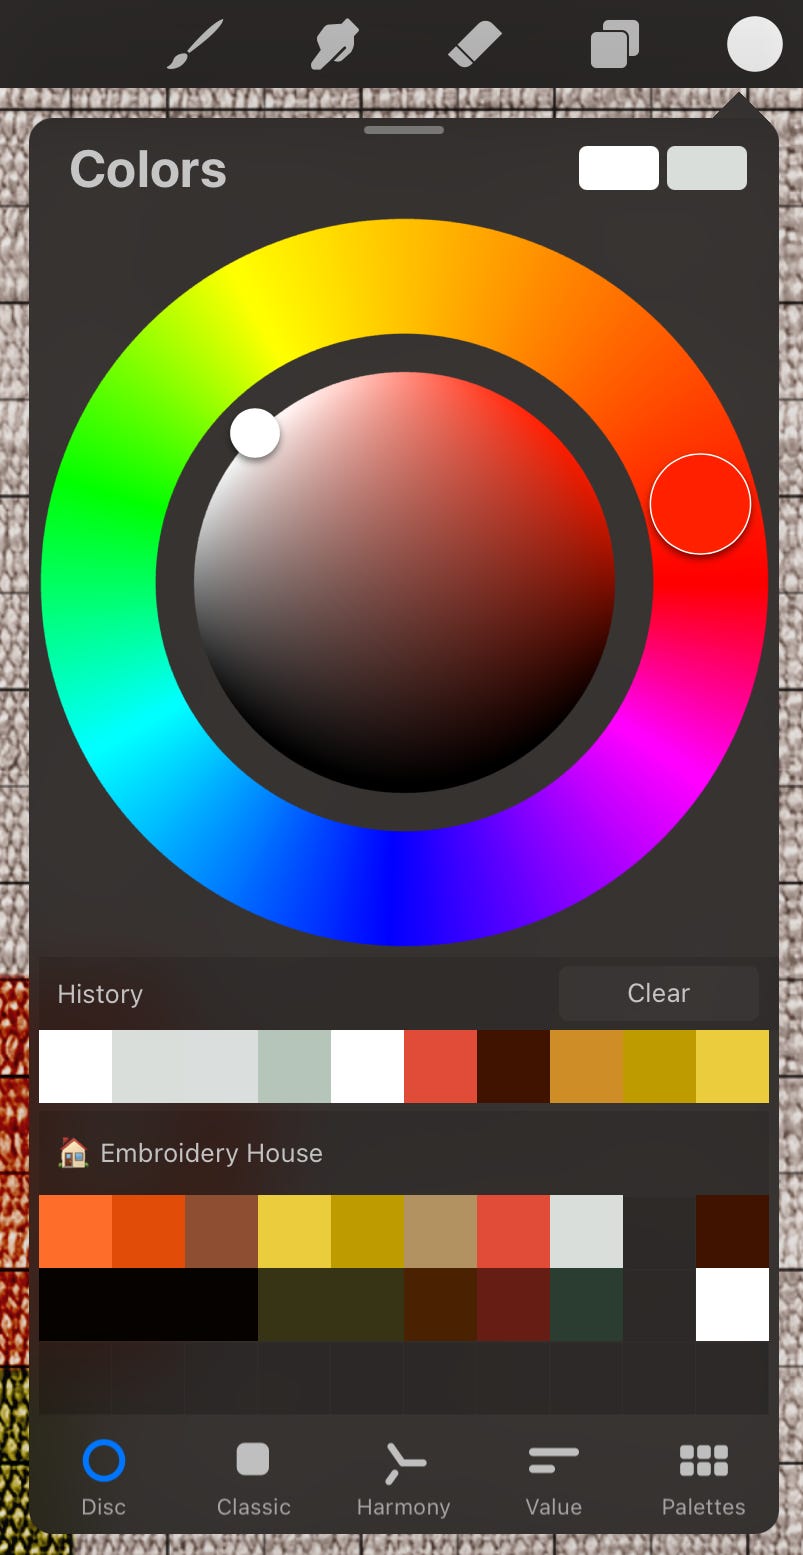
Set Up Your Dual Colors:
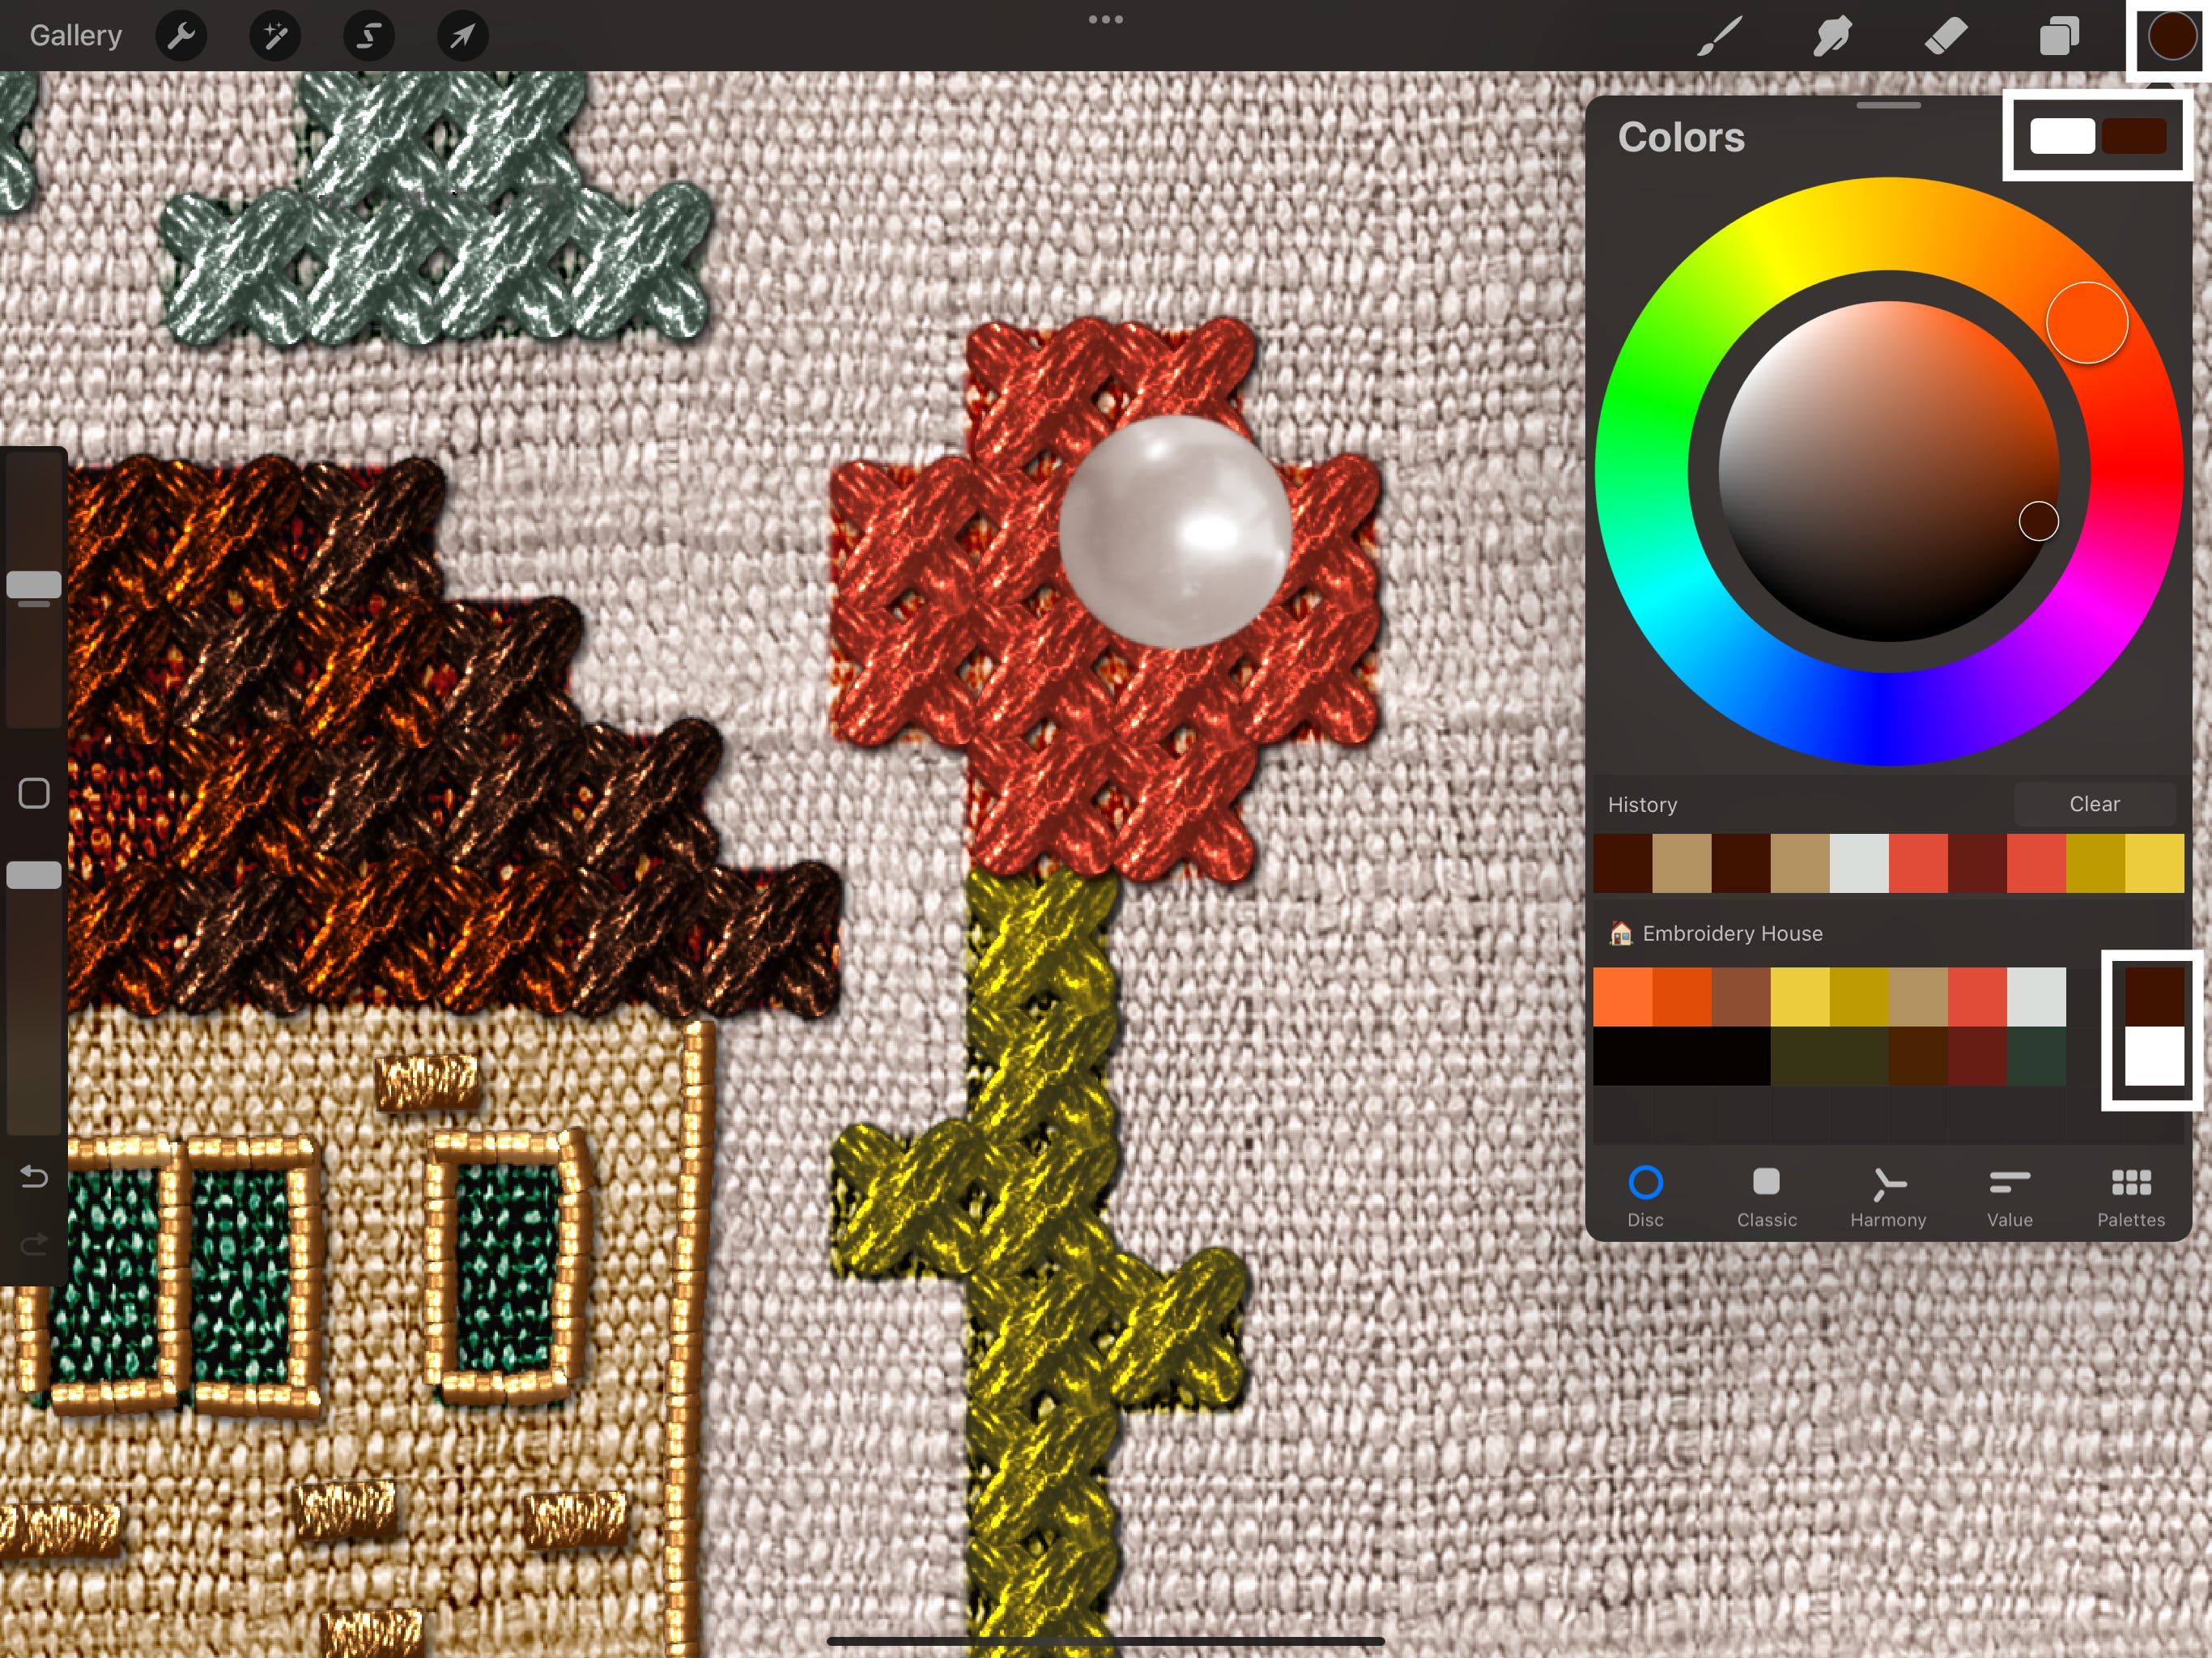
Now, we’ll select the two “thread” colors we need for this layer from our Embroidery House palette (which should be your default palette if you followed the previous setup steps).
Open the Colors panel by tapping the color circle in the top right corner of your Procreate screen.
At the top right of the Colors panel, you’ll see two small rectangular color swatches. These are your primary and secondary color slots. More on these colors and how to set them up here.
Tap the first (left) color swatch.
Then, from your palette, tap on the dark brown/black color (it’s the very first color in the second row of the palette). This loads it as your first color.
Next, tap the second (right) color swatch.
From the palette, tap on the bright orange color (it’s the very first color in the top row of the palette). This loads it as your second color.
To ensure the orange is your active color, check if the color circle at the top right of your Procreate screen is orange.

If you need more clarity, please read this guide: How to Set Colors for Dual-Color Embroidery Brushes.
Set Up Your Brush:
Select the Brush:
Open your Brush Library by tapping the paintbrush icon 🖌️ in the top right menu.
Navigate to your 🏠 Guide brush set (or whatever you named the brush set provided for this tutorial).
From this set, tap to select the
#02✨ /Small Cross/brush.
Adjust Brush Size:
Once the brush is selected, look at the brush size slider on the left side of your Procreate screen.
Adjust this slider until the size reads 49% — it’s the exact size that matches the grid.
Your #02✨ /Small Cross/ brush is now active and set to the correct size, ready for stitching the roof!

Add Stitches to the Roof:
With your Roof Light layer active (highlighted blue), #02✨ /Small Cross brush selected (size 49%), and your dual colors set (orange as primary, dark brown/black as secondary), we can now start stitching the lighter areas of the roof.
You can choose where to place these lighter stitches as you wish!
In my example image below, I’ve added them mainly to the left side of the roof, imagining that’s where light might be hitting and making that side appear a bit brighter. The overall goal is to create a pattern that suggests light interacting with the roof tiles.
Each tap will place a single cross-stitch mark with that lovely dual-color effect. Don’t worry too much about being perfectly random; feel free to experiment with different placements within the roof area.
If you decide to add lines of stitches, they will be perfectly straight as the layer is Assisted.
Working with the ‘Roof Mid’:
Now, let’s add some depth with our mid-tone “threads.”
The process is very similar to what we did for the ‘Roof Light’ layer.
Select the ‘Roof Mid’ Layer:
In the Layers panel, tap on your ‘Roof Mid’ layer to make it active (it will highlight in blue).
Tap the layer again to open its Layer Options menu and select Drawing Assist.

Set Up Your New Dual Colors:
Open the Colors panel.
We need to select our next color pair from the Embroidery House palette.
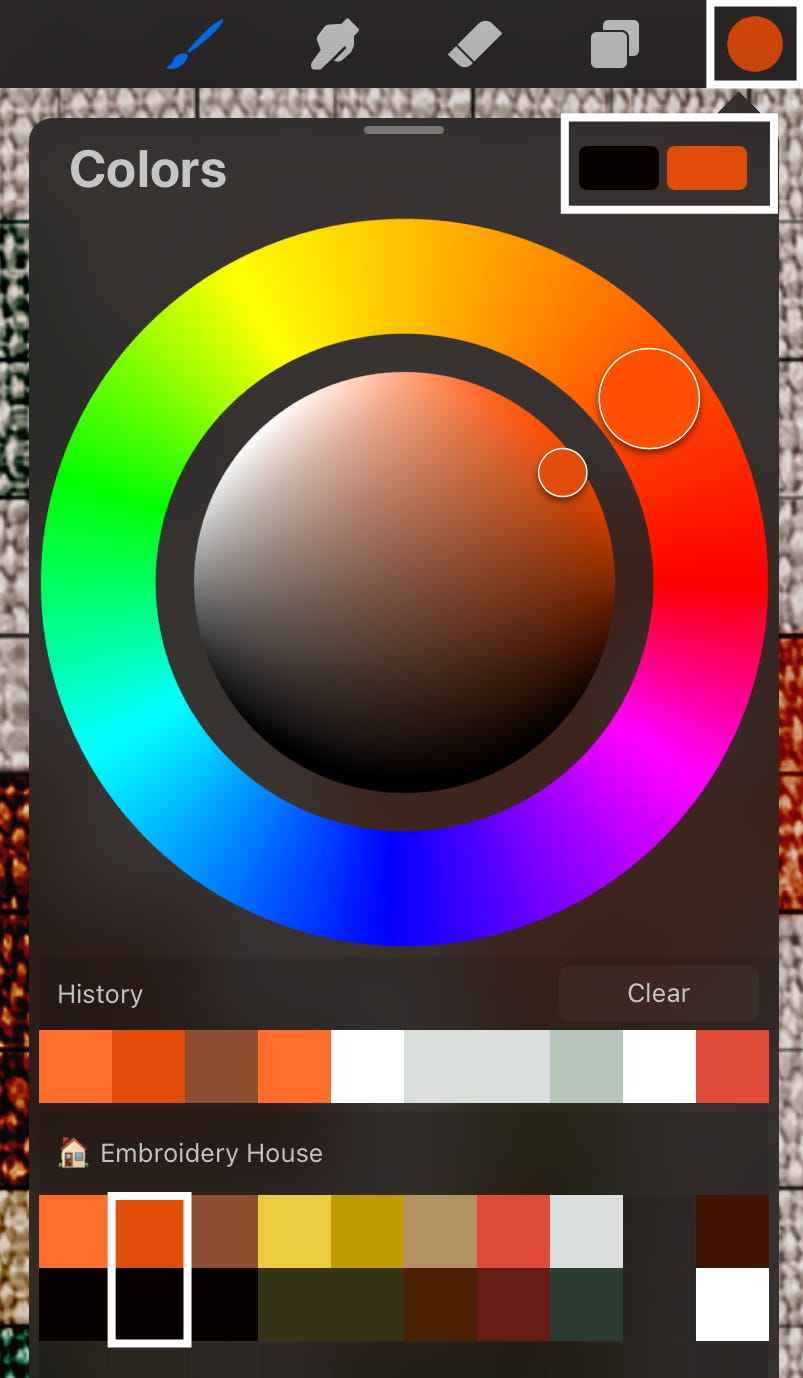
Tap the current orange color swatch at the top right of the Colors panel.
From your palette, select the medium orange/brown color (it’s the second color in the top row).
Another color search (dark brown should remain the same as before).
Verify Your Colors:
The color circle at the top right of your Procreate screen should now show this medium orange/brown.
The two small rectangular swatches at the top right of the Colors panel should show:
Medium orange/brown
Dark brown/black (this should have remained unchanged from the previous step).
Add Mid-Tone Stitches:
With your #02✨ /Small Cross/ brush still selected (at 49% size), begin tapping to add stitches to the ‘Roof Mid’ layer.
Focus on filling in areas of the roof that are not the absolute brightest highlights, but also not the deepest shadows. Think of these as the main body color of the roof tiles.
Again, feel free to experiment with placement to achieve a look you like!

Working with the ‘Roof Dark’:
Finally, let’s add the deepest shadows to the roof to give it real dimension. As you might have guessed, the process is just like the previous two layers, but with our third color combination!
Select the ‘Roof Dark’ Layer:
In the Layers panel, tap on your ‘Roof Dark’ layer to make it active (it will highlight in blue).
Tap the layer again to open its Layer Options menu and select Drawing Assist.

Set Up Your New Dual Colors:

Add Dark Stitches:
Step 7. Stitch the Tree Trunk
Now, let’s stitch the tree trunk.
You’ve got some flexibility here, and to keep our layer count manageable, we can cleverly reuse some of our previous setups.
Instead of creating a new layer, you can add the tree trunk stitches to one of your existing Roof layers. This is a great way to keep your project organized without too many extra layers.
For the tree trunk, you can use one of the color pairs we set up for the roof. The combination used for the Roof Dark layer (darkest orange/brown as primary, dark brown/black as secondary) often works well for a traditional trunk color.

Step 8. Add Shadows
To make our roof stitches look like they have some real depth and lift off the fabric, we’ll create a subtle drop shadow.
This involves a bit of layer management and some cool adjustments!
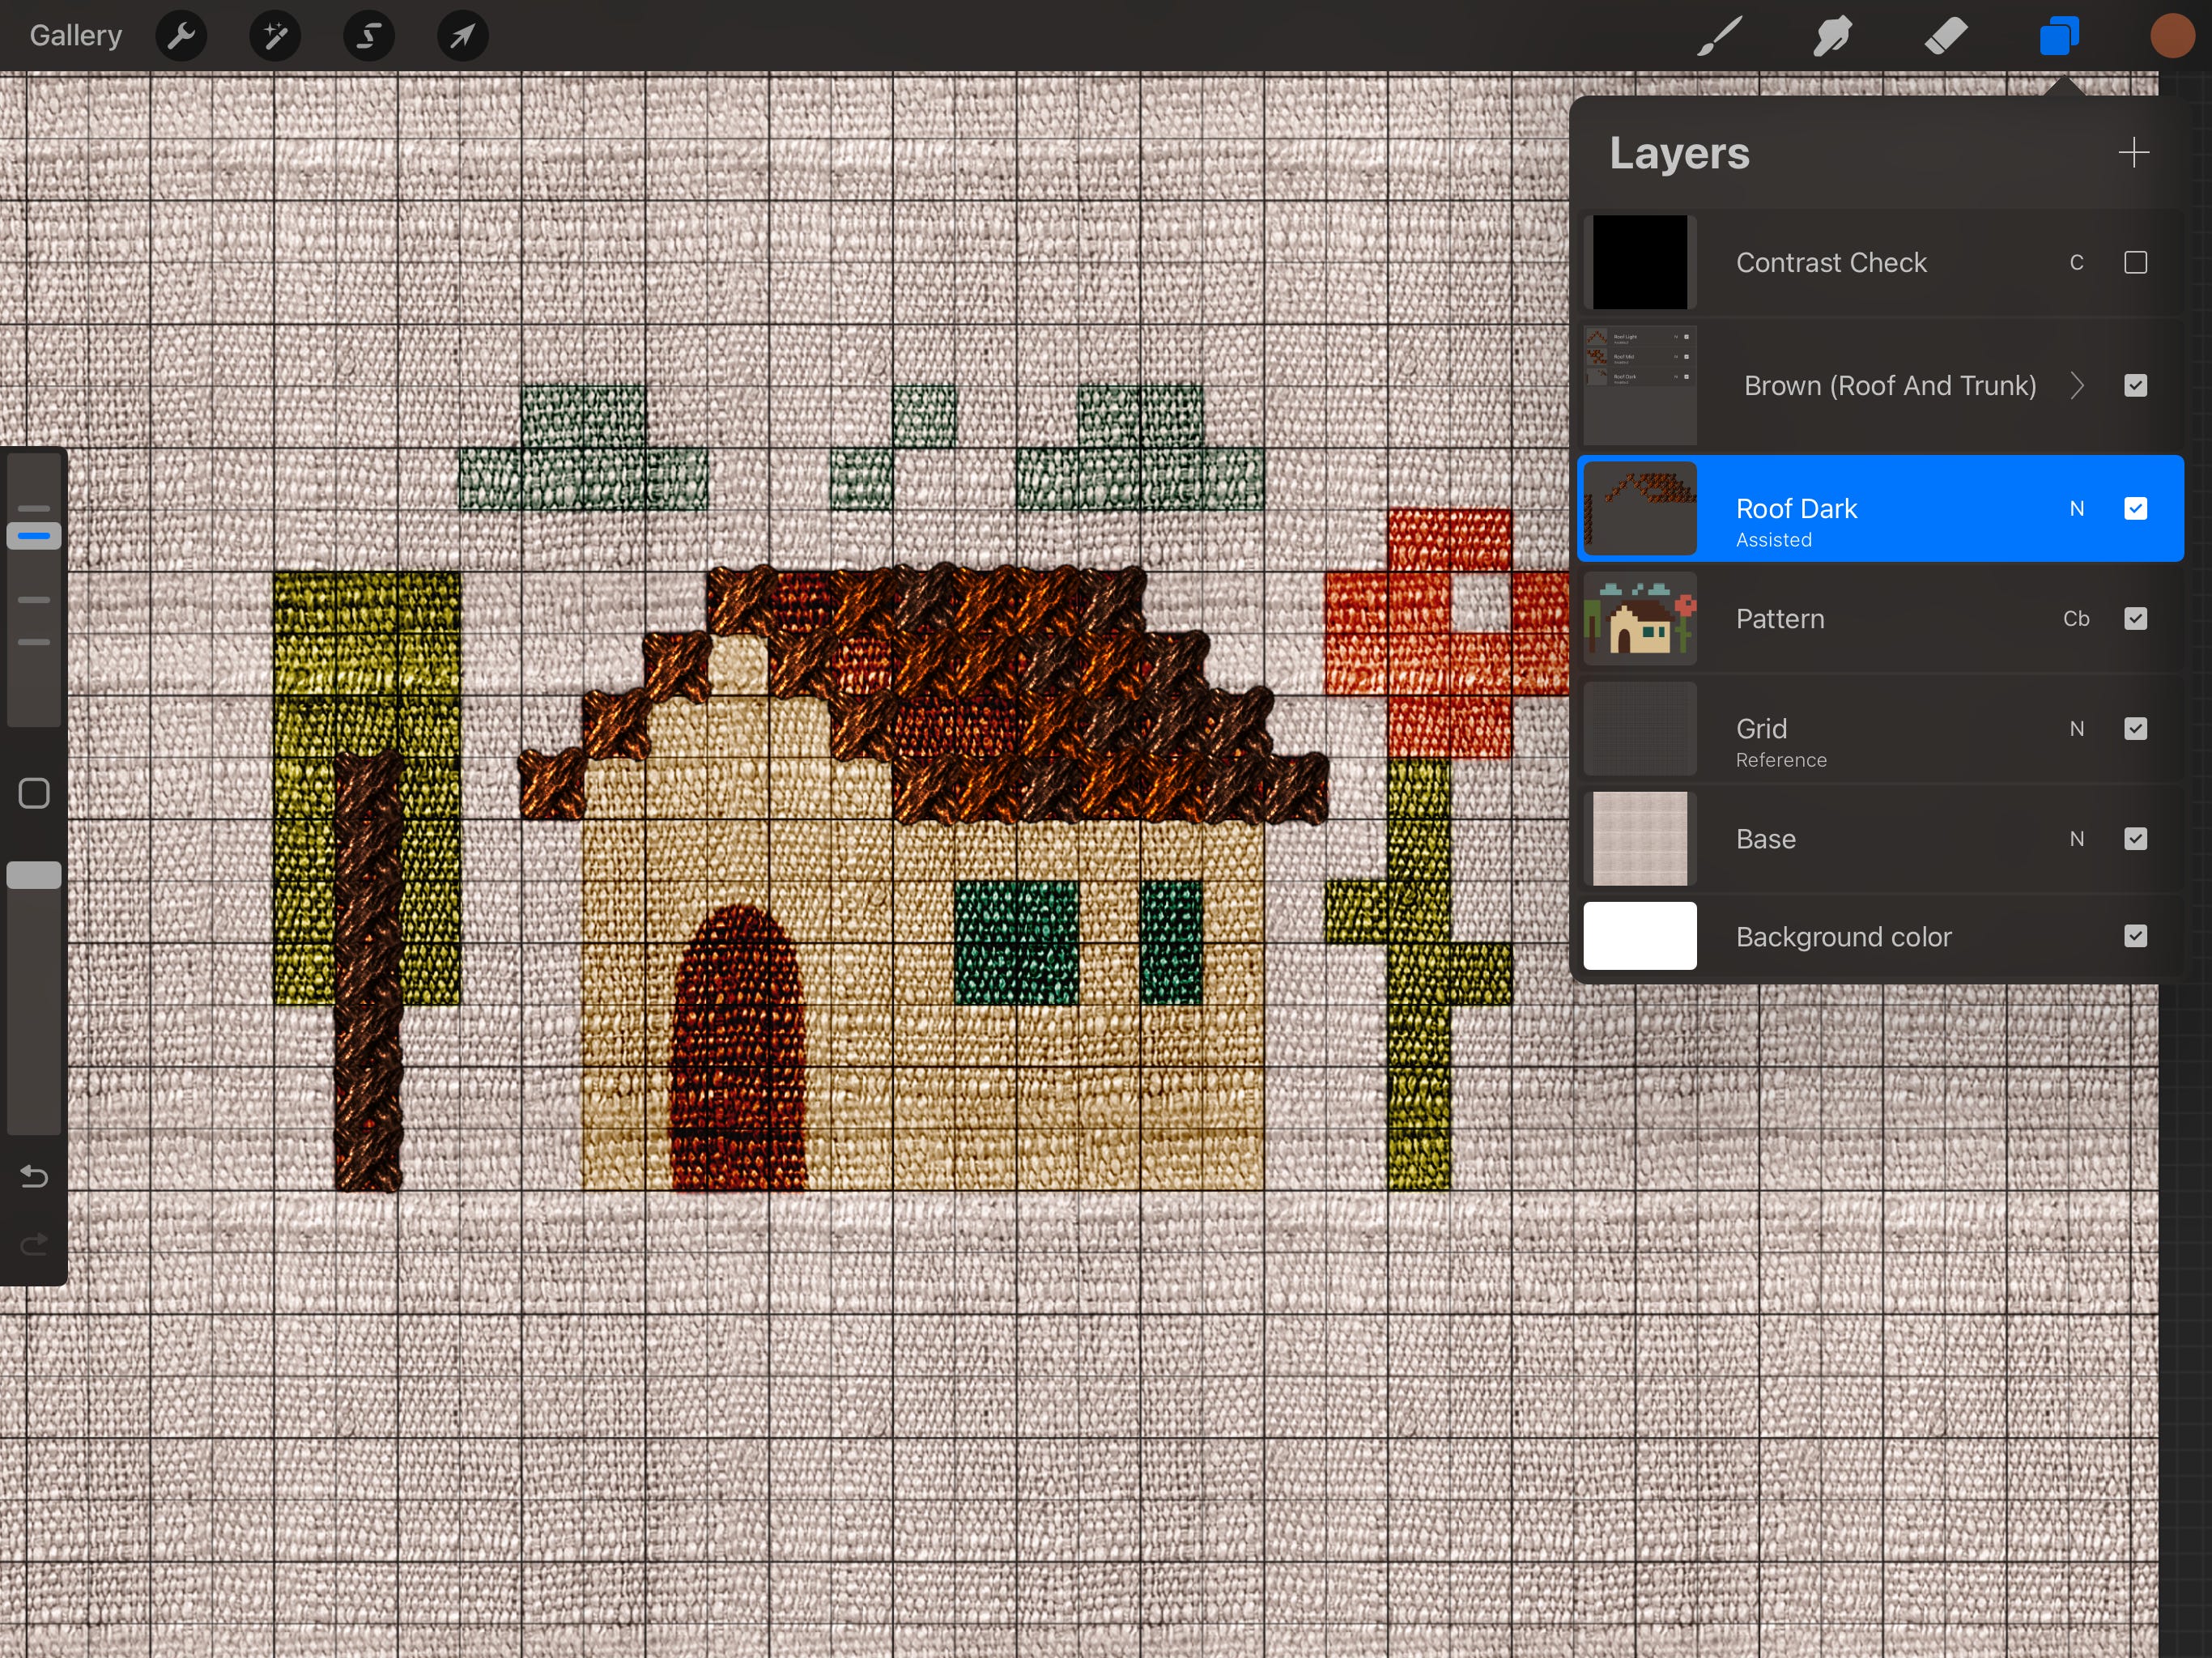
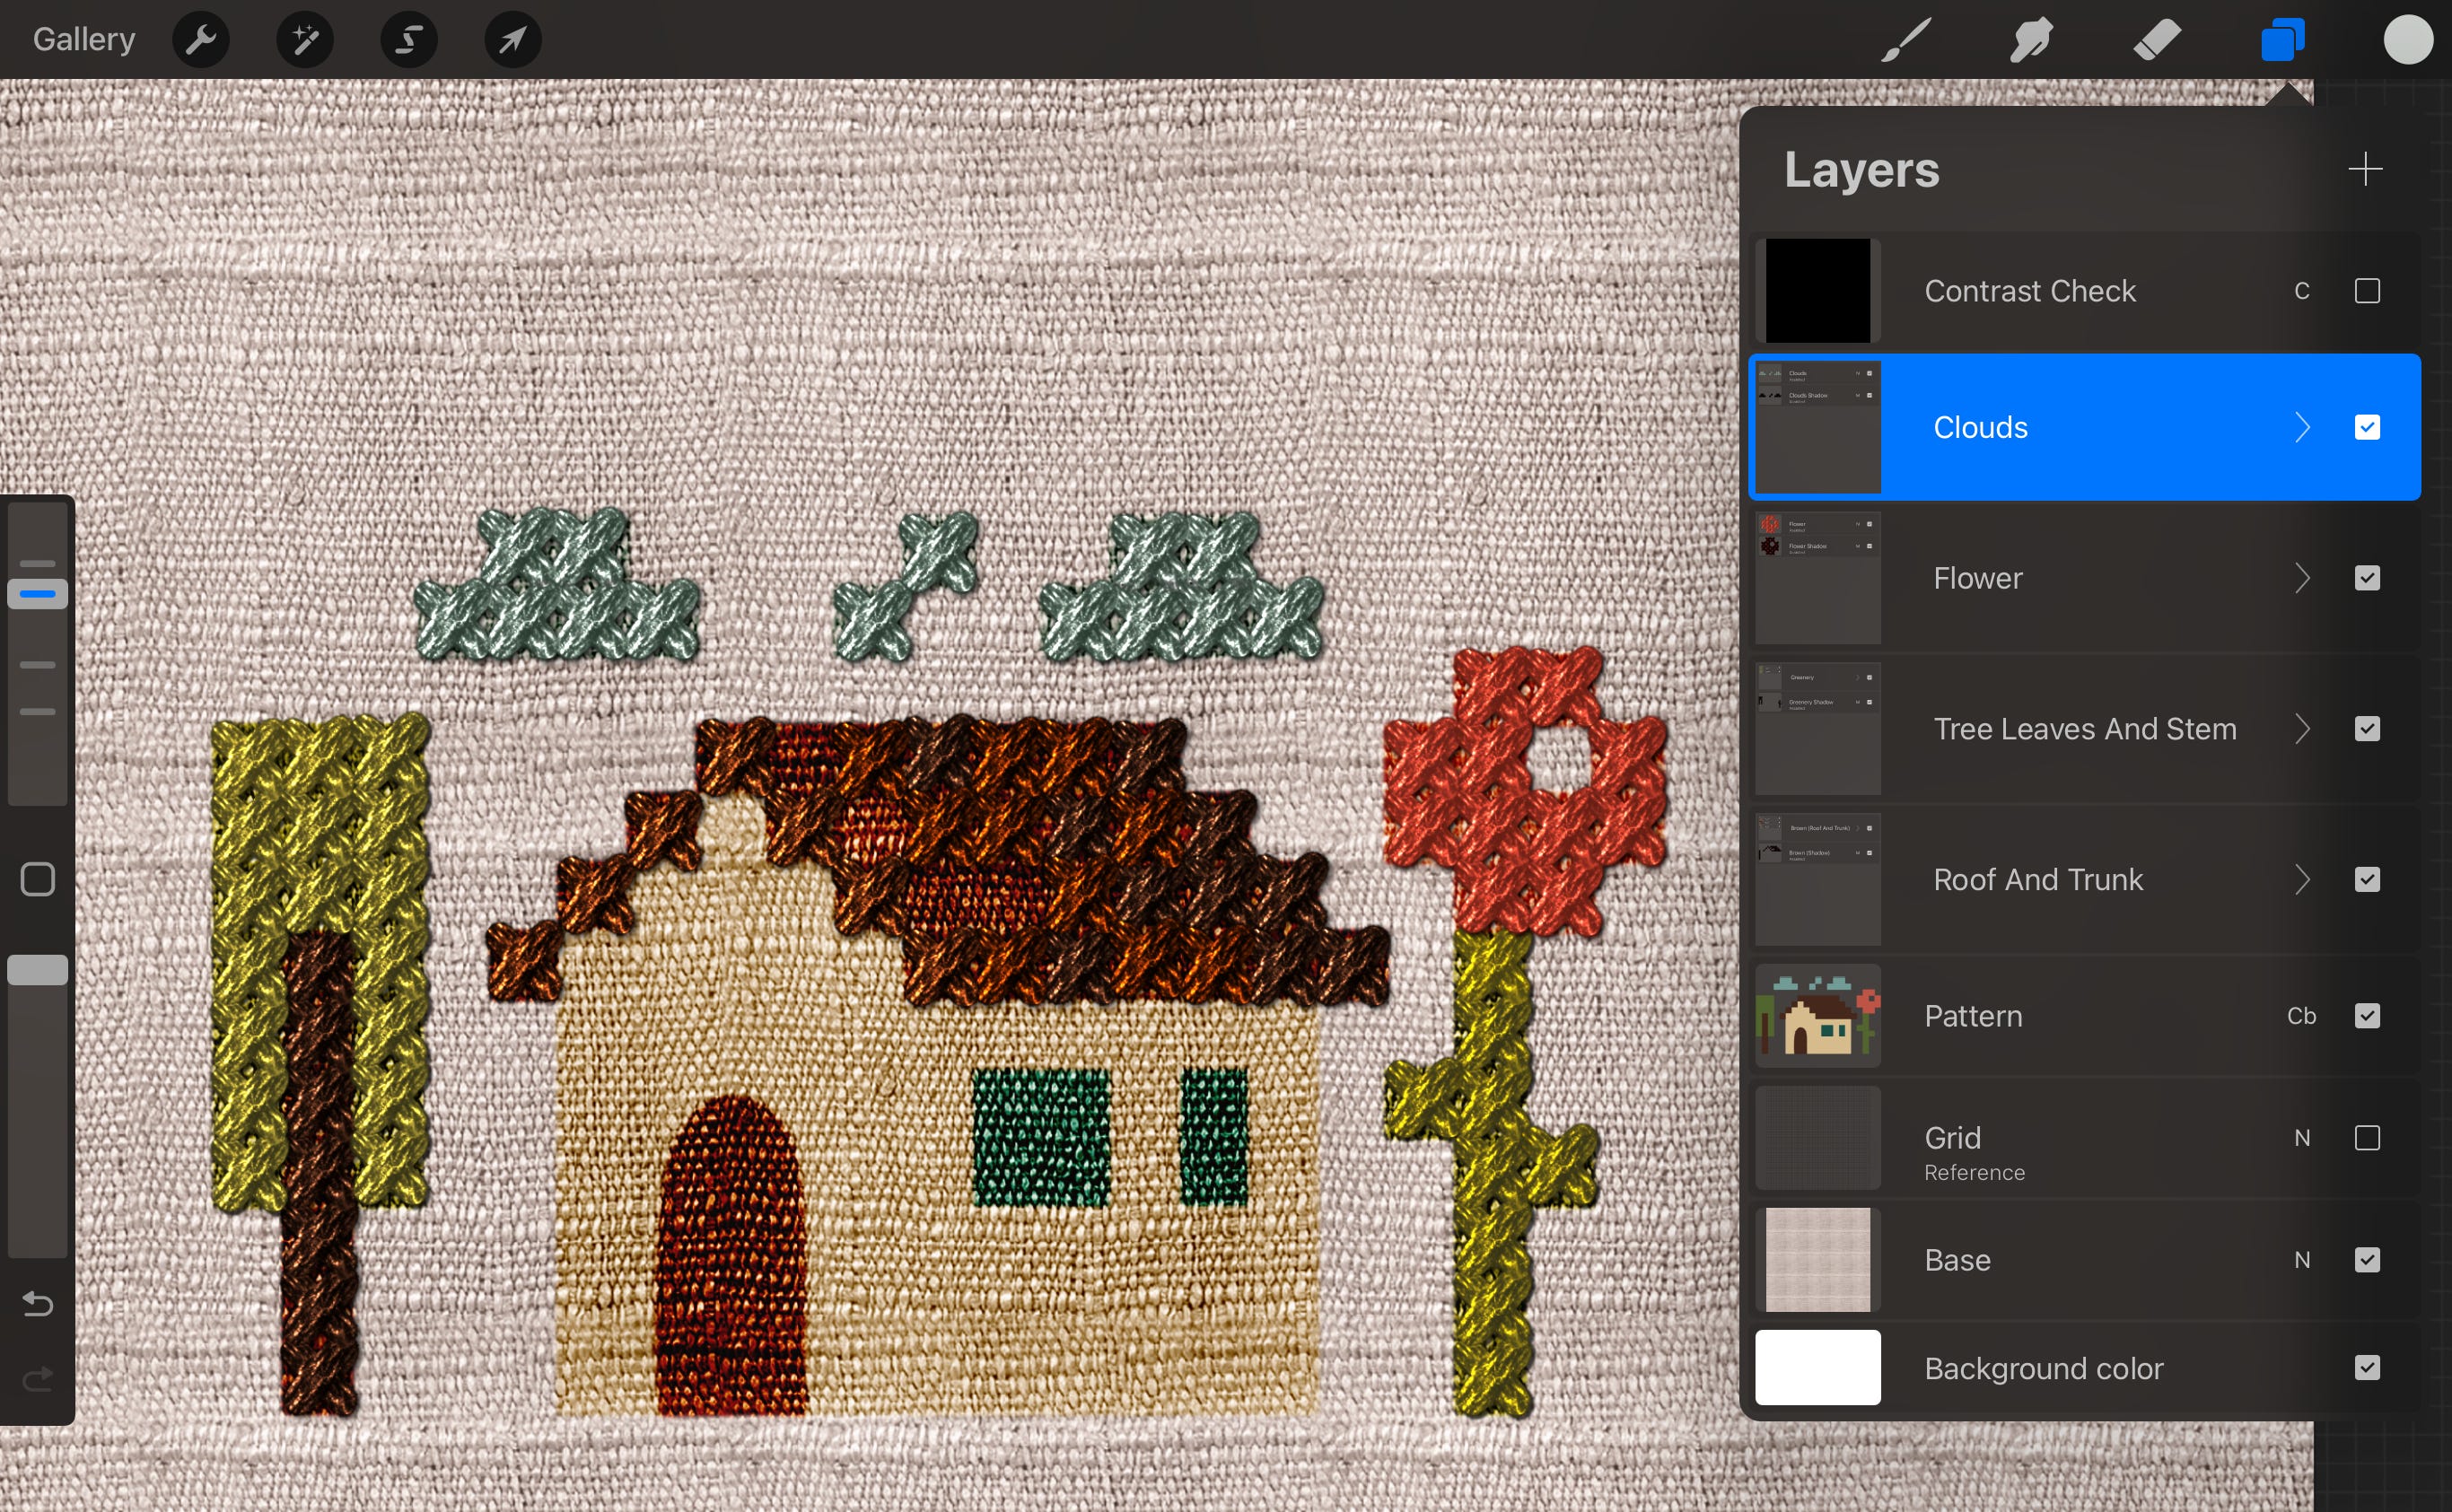
Housekeeping: Group and Prepare Roof Layers:
First, let's organize our roof stitch layers. In the Layers panel, select all three of your roof layers: Roof Light, Roof Mid, and Roof Dark. (You can select multiple layers by swiping right on each one you want to include).
With them selected, tap the Group button that appears at the top of the Layers panel.
Let’s rename this new group. Tap on the group (it might be called ‘New group’), tap it again for Layer Options, choose Rename, and call it something like ‘Brown (Roof and Trunk)’.

Now, duplicate this group. (Swipe left on the group and tap Duplicate). You’ll have two identical groups.
Create the Shadow Base:
Select the lower of the two groups. We’ll turn this one into our shadow.
Tap on this lower group to open its Layer Options menu and choose Flatten. This will merge the duplicated roof stitches into a single layer.
Darken the Shadow Base:
Make sure your new layer (the flattened one) is selected.
Go to Adjustments (magic wand icon 🪄) > Hue, Saturation, Brightness.
In the menu at the bottom, slide the Brightness slider to the left (~29%).

This will make the layer a very dark version of your stitch colors, which is perfect for a shadow.
Tap the Adjustments icon again to apply.
Offset the Shadow:
With the shadow layer still selected, tap the Transform tool (the cursor icon) in the top menu. You’ll see a dotted box appear around your selection.
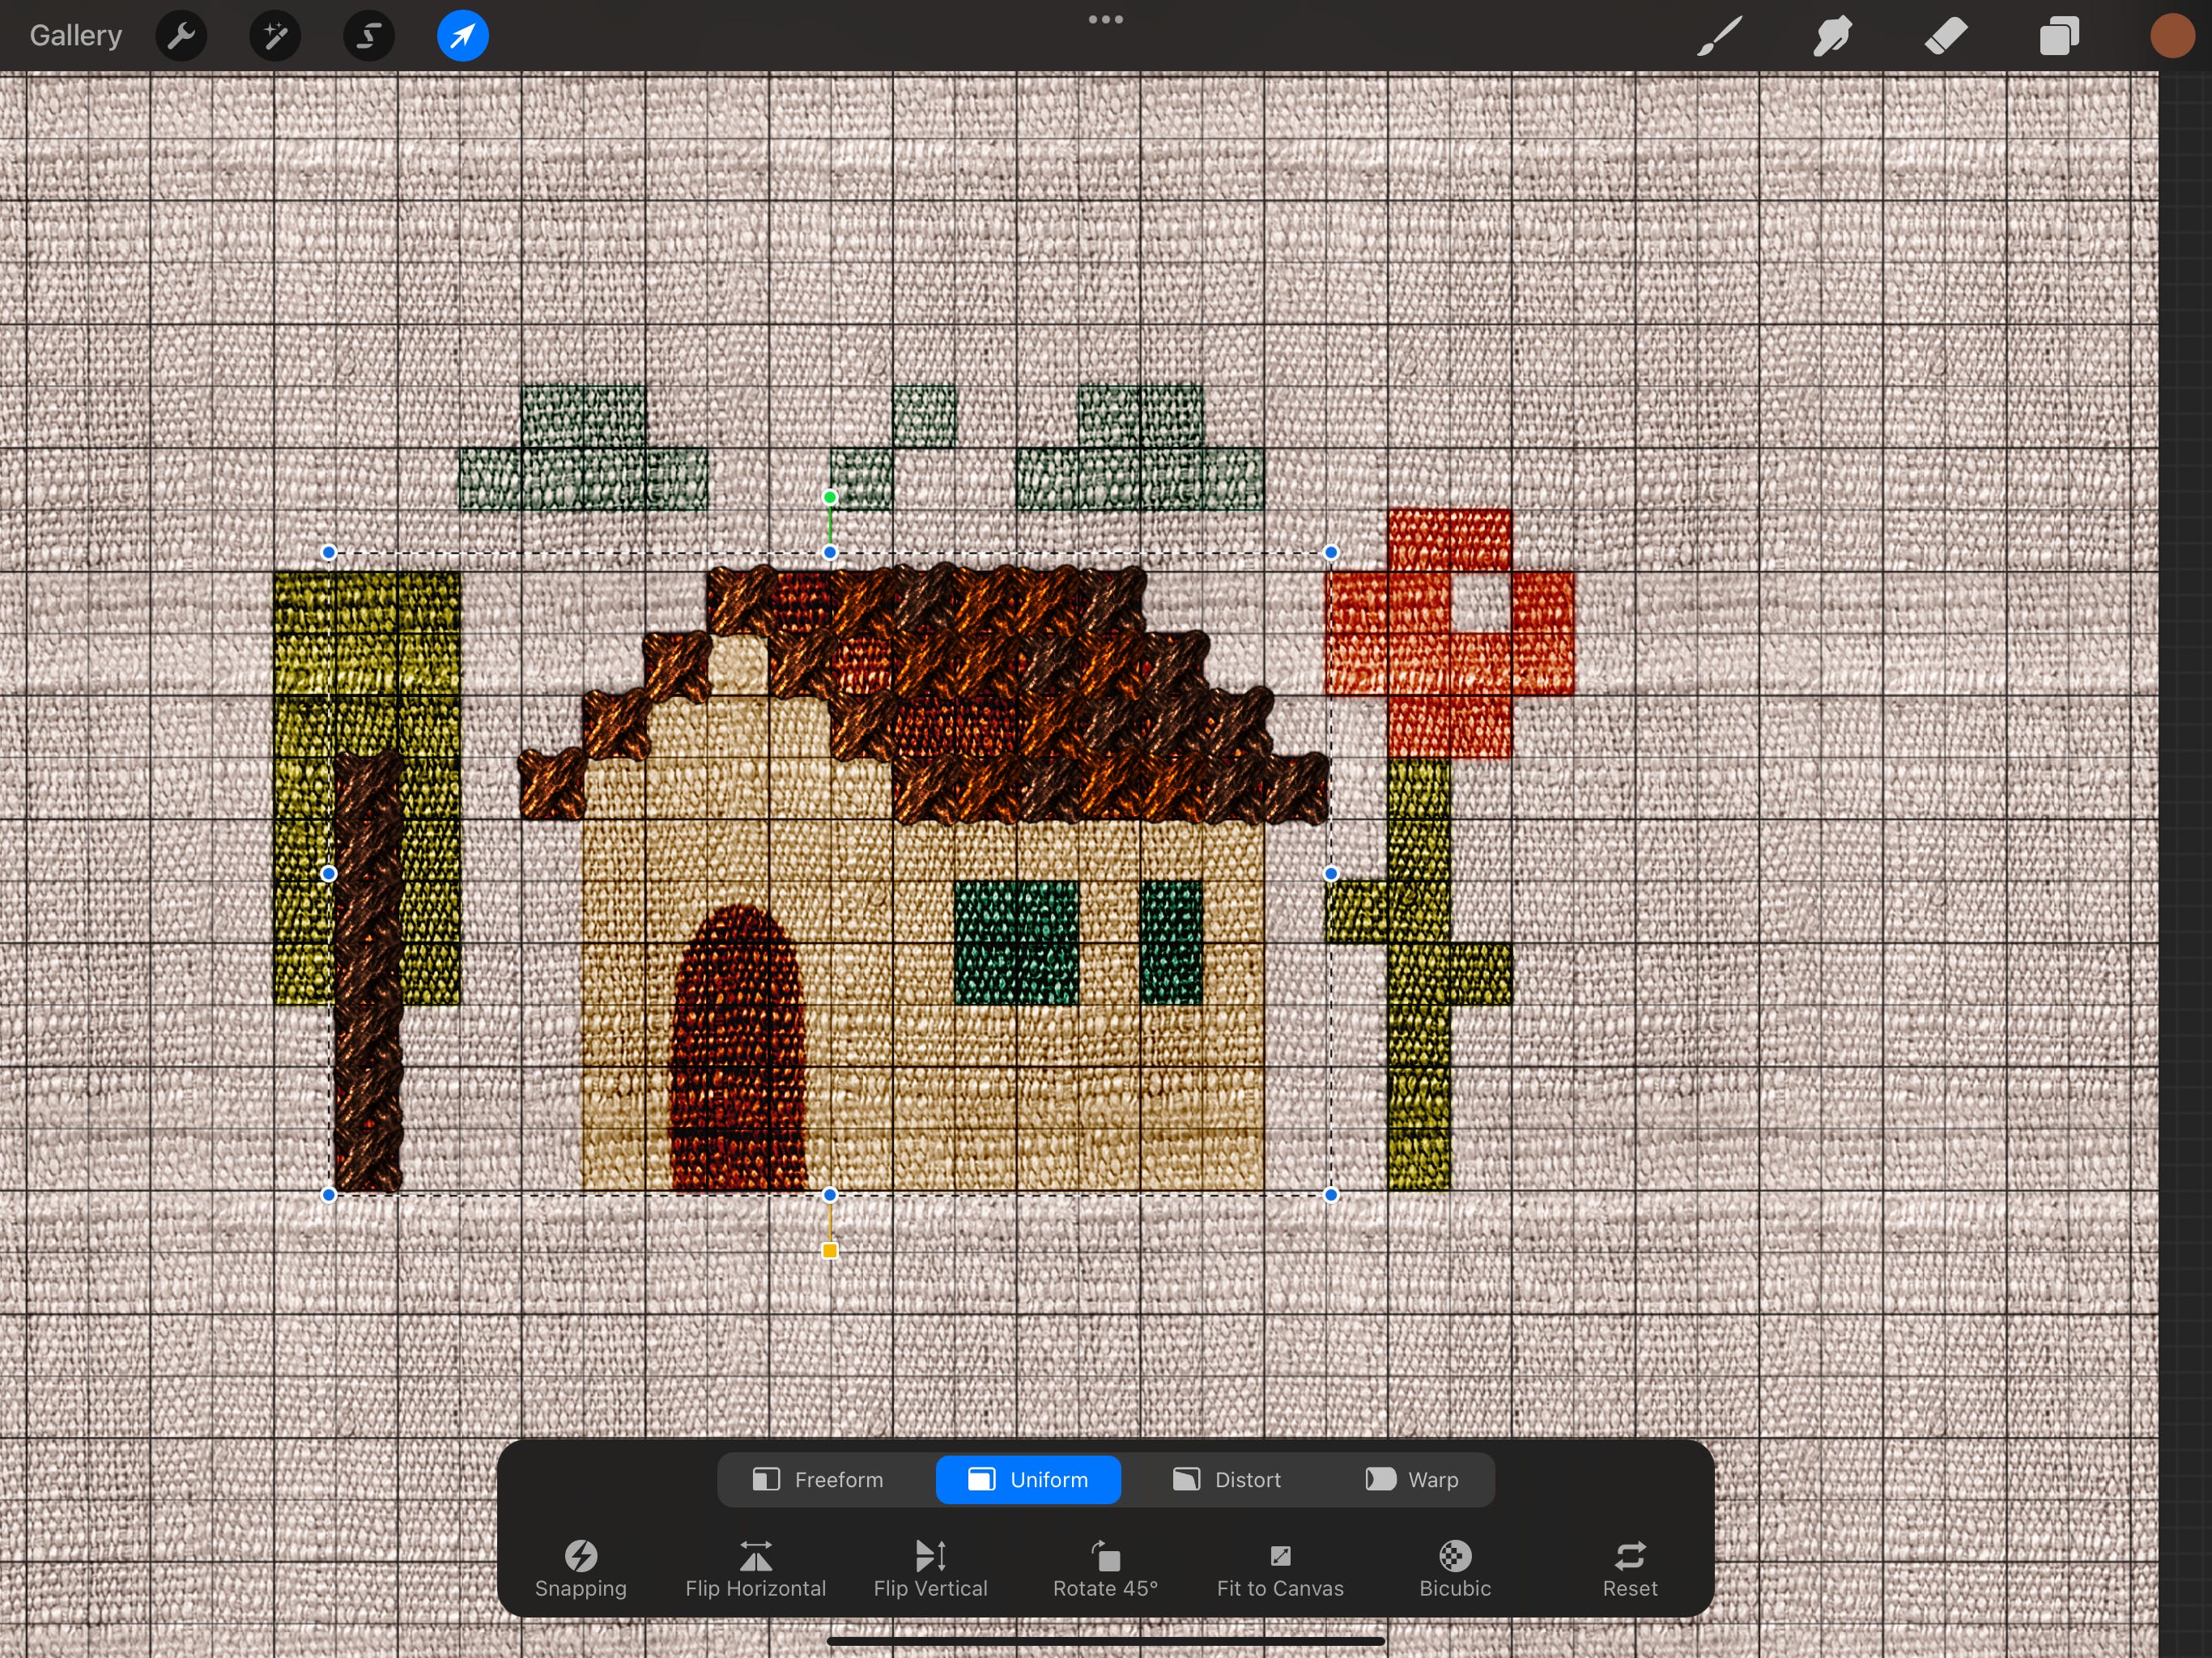
To nudge the shadow down and to the right (creating a ↘️ effect):
Gently tap 2-3 times on the screen just outside and below the bottom-right corner of the selected area. Each tap will move (nudge) the layer by one pixel in that direction.
You should see the black shadow layer peeking out from under your original roof stitches group.
Tap the Transform tool icon again to commit the change.

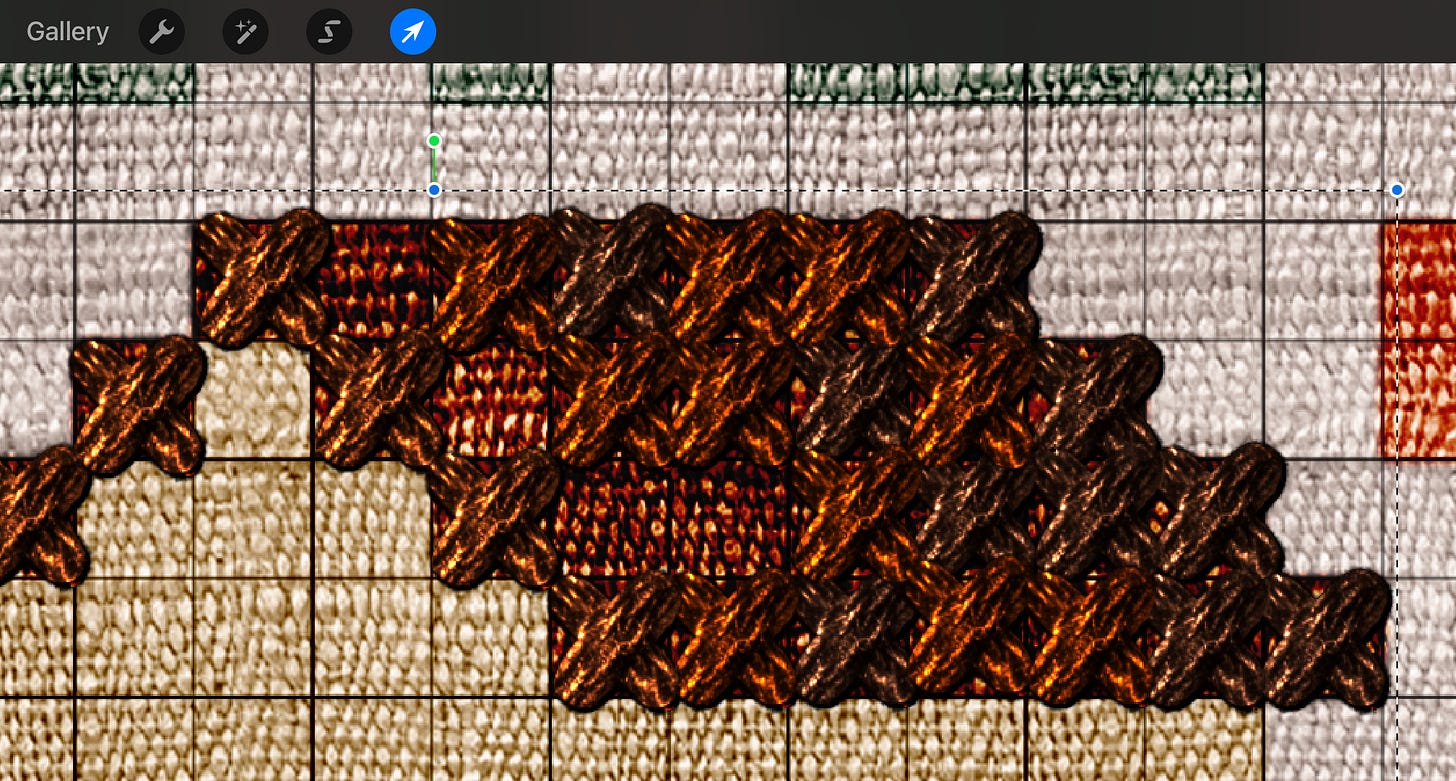
Soften and Blend the Shadow:
With the shadow layer still selected:
Go to Adjustments (magic wand icon 🪄) > Gaussian Blur.
Slide your finger/pencil on the screen to the right to apply a blur. Aim for around 3% to give it a soft edge. Tap the Adjustments icon to apply.

Finally, tap the N on the shadow layer to open the Blend Mode menu. Change the blend mode to Multiply.
Then, lower the Opacity of this shadow layer to about 70% (or adjust to your liking – sometimes a softer shadow around 30-50% looks more natural).


And there you have it! Your roof stitches should now have a nice shadow underneath, making them appear more three-dimensional.
Also, you can group the group and the shadow into the new group.

Step 9. ‘Stitch’ the Leaves, Flower, Clouds
Now it’s time to bring in other elements.
The process will be very similar to how we stitched the roof, using dedicated layers for different shades, if you wish, or a single layer if you prefer a simpler look for these smaller areas.
Take your time to fill in all the remaining areas. The process should feel familiar now!


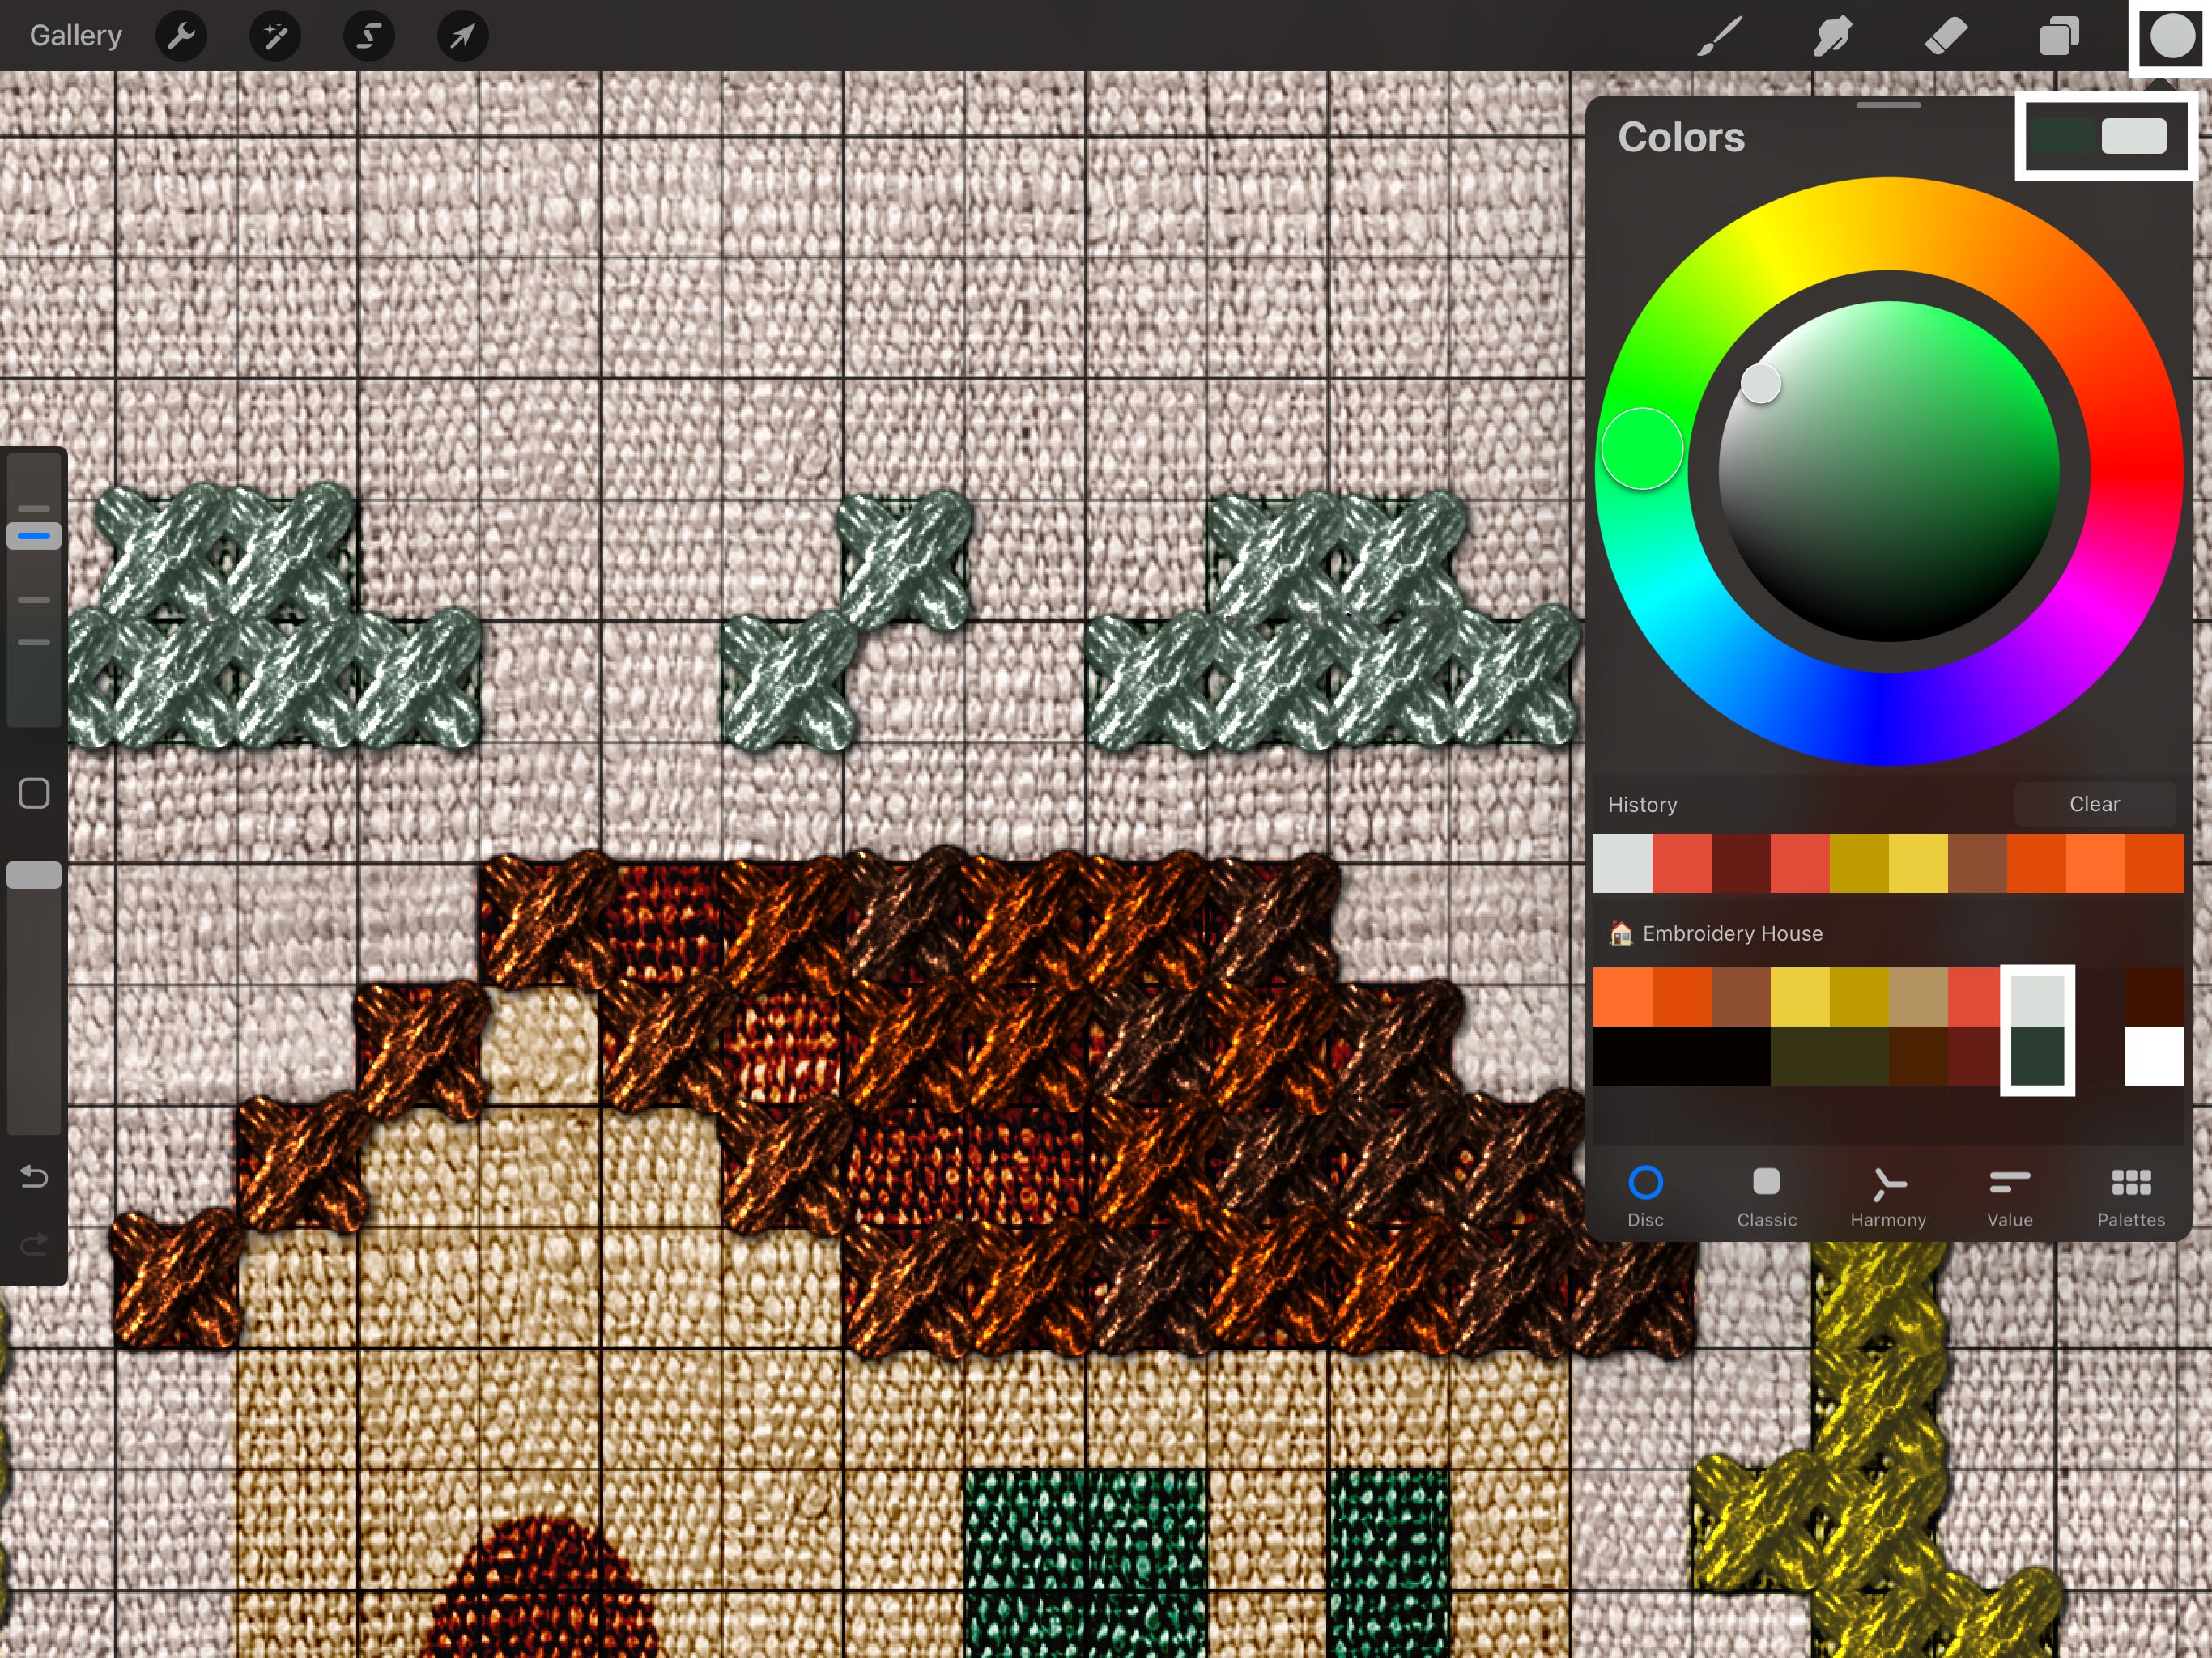
Finally, turn off the grid.
Step 10. Add Embellishments
This step is optional… but a good opportunity to play with other brushes in the set.
First, let’s add house borders with the Basic Beads brush.

Here is the color pair and set up we should use:
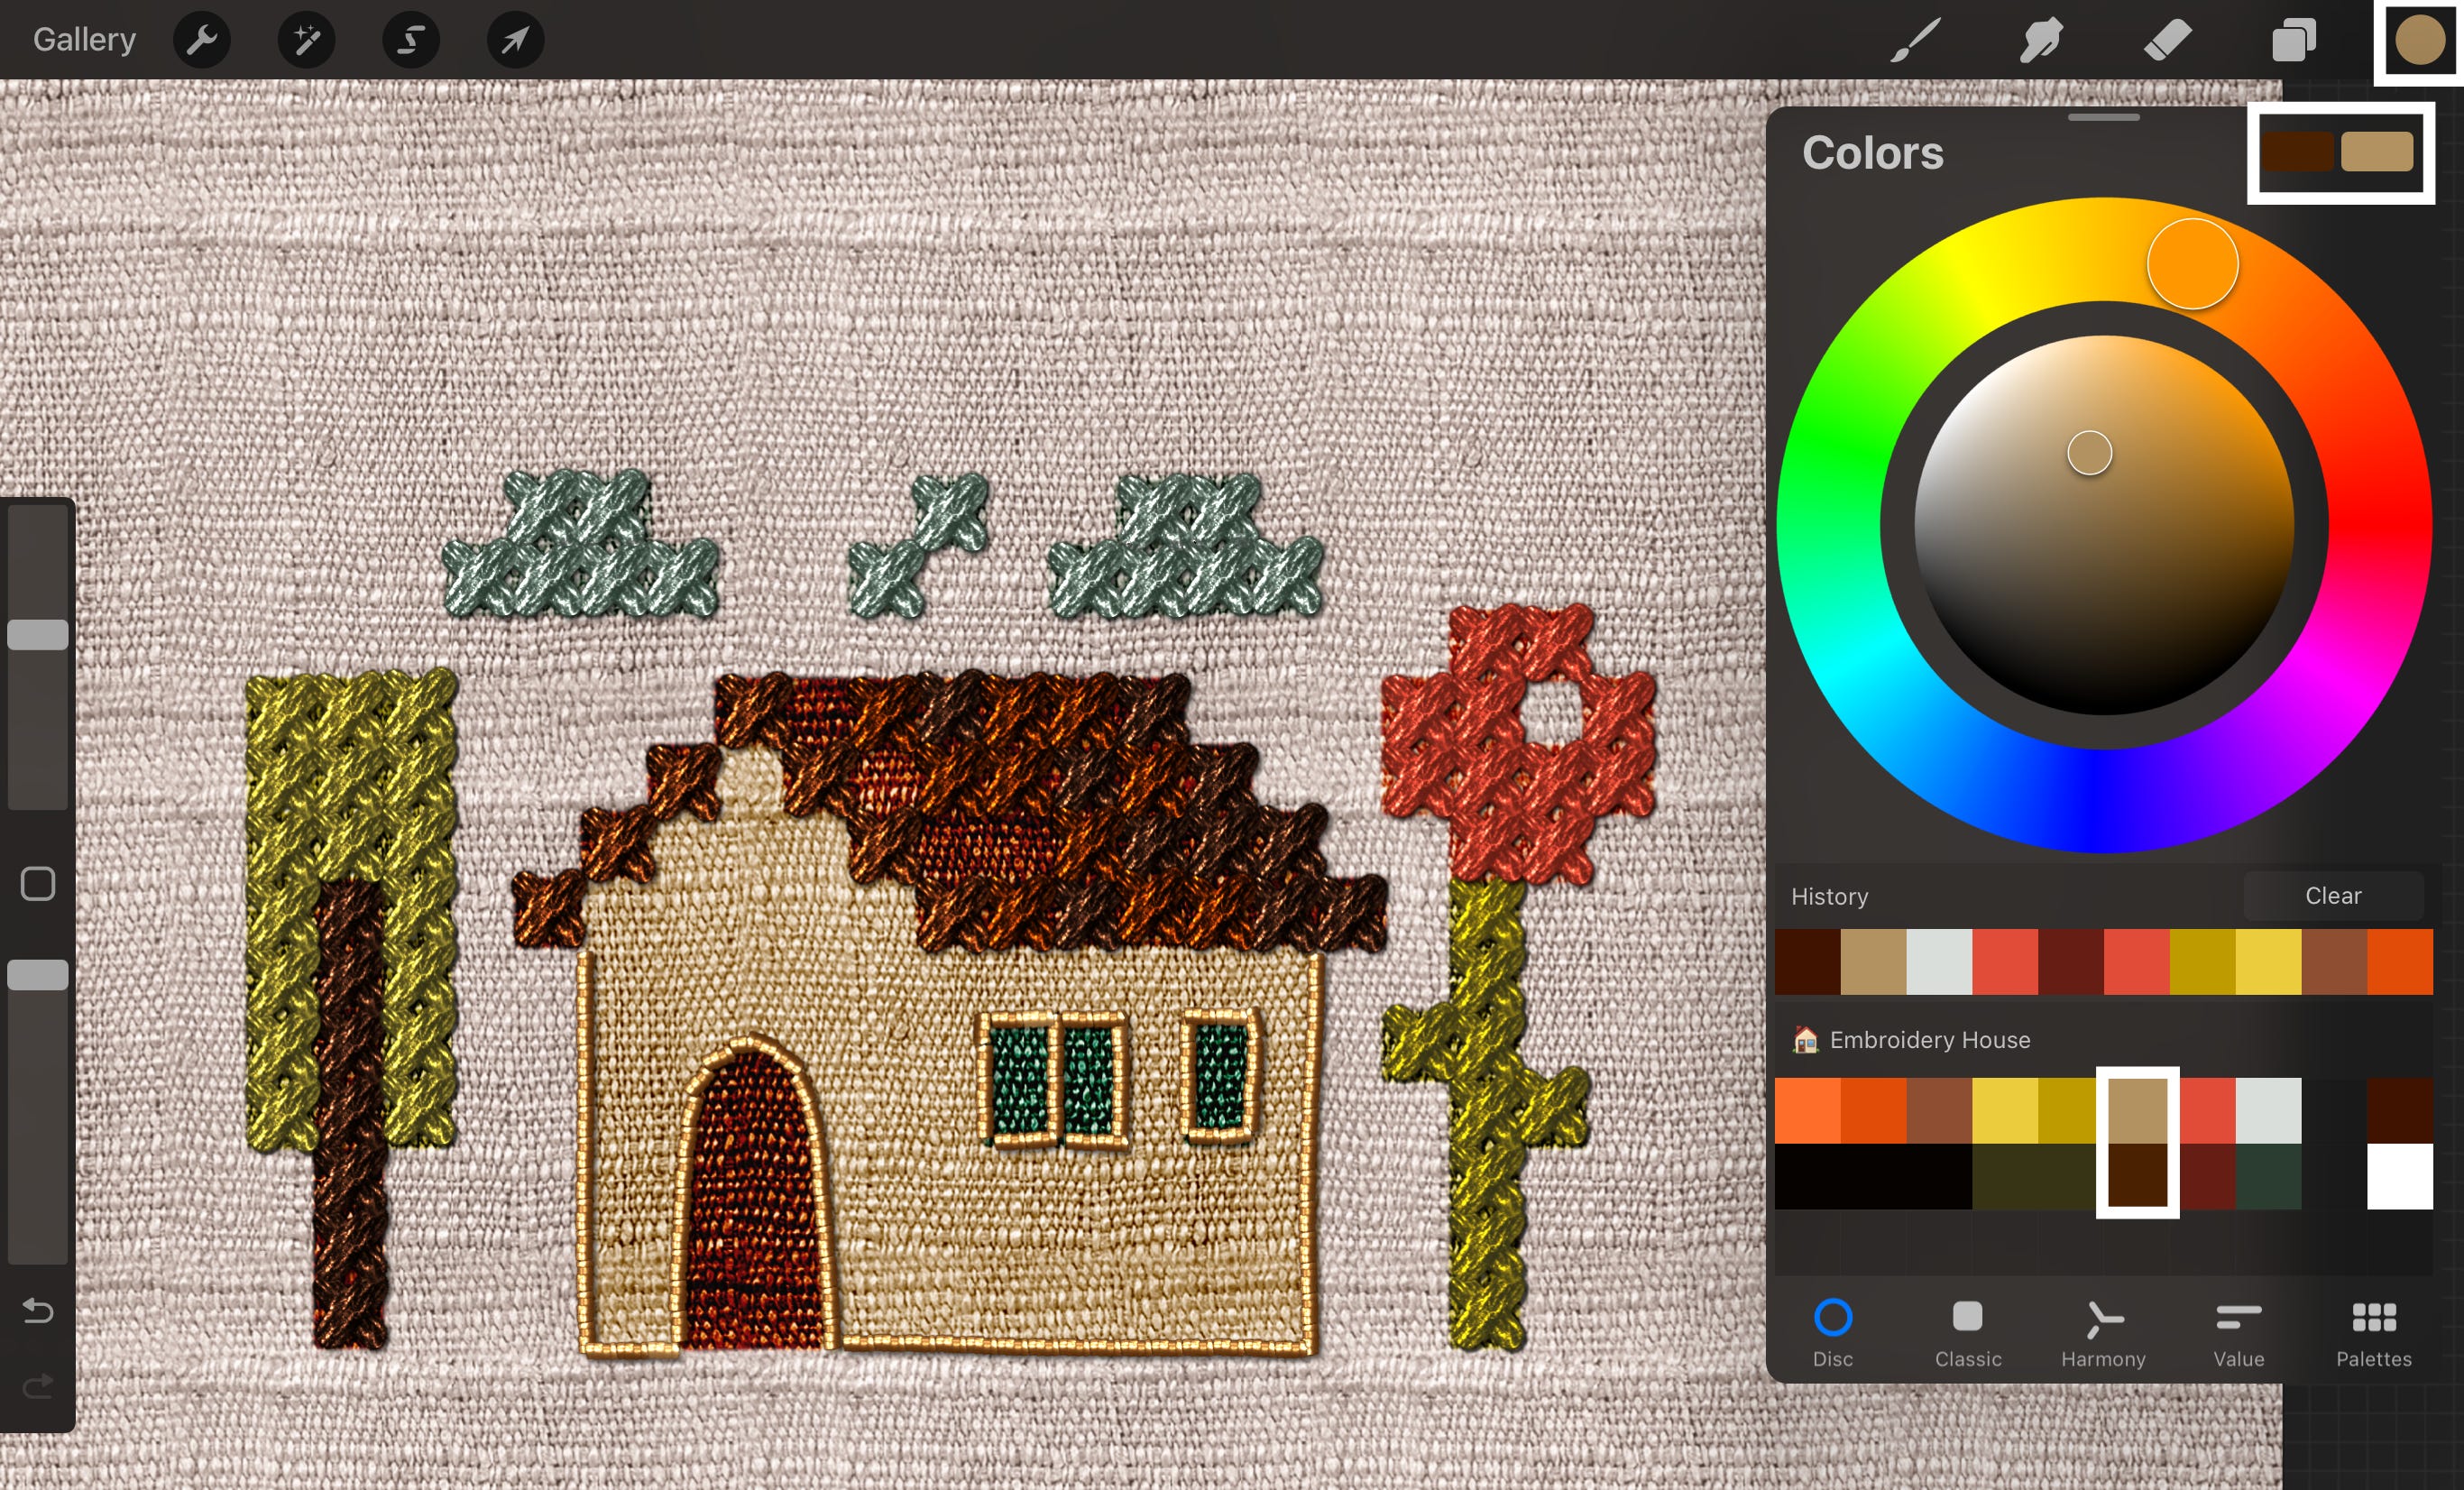
Pro tip: Use several layers to avoid bad-looking overlays.
Also, with the same colors, use the Am I Bamboo? brush to add individual ‘bricks’:

Step 11. Pearl 🦪
For the pearl, use the Vintage Pearl brush and the last color pair.
Important note — this time the dark color should be active because it’s a 🔳 brush. More on this here.
And voilà! Using the techniques learned in this tutorial, you can create your own digital embroidery art.
